Unbreakable Windshield
Repair Resin

Ultra Bond has passed the same Federal Motor Vehicle  Safety Standards (FMVSS 205) as a New Windshield. Ultra Bond is the only known Lab Tested Windshield Crack Repair Resin on the market that passed the ROLAGS Standard with results that are Stronger Than A New Windshield!
WHY USE ULTRA BOND?

WORLDS HIGHEST LAB TEST SCORES 

UNDERSTANDING SURFACES FOR USING

THE CORRECT RESINS AND TOOL SETUP


Surface Tension is present with windshield repair because there are two substrates. (1) The glass which is high energy and (2) the PVB which is low energy. The resin (low energy) is more attracted to the glass than it is to the PVB. Resin wets the glass but not the PVB. Meaning the bond is an inter-molecular chemical bond to the glass but a mechanical bond to the PVB. This tension will cause the resin to pull back and off of the PVB upon curing when the resin begins to shrink as it cross-links to itself and the glass. This can happen and be seen upon or after curing. This will show up as a bubble or void with a stone break and with a crack repair a long thin separation along the PVB called a "runner".

High Energy Surfaces versus Low Energy Surfaces - High energy surfaces are strong solid hard surfaces where the bonds that hold them together are very strong such as glass, ceramic and metal. These high strength chemical bonds are called covalent, ionic or metallic. Low energy surfaces are soft, deform or bend easily such as PVB. Liquid adhesives are also low energy, they can wet and bond easier to high energy surfaces than they do to low energy surfaces. Two low energy surfaces do not bond well.

The method used by most with a stone-break repair to cure this deficiency is to cure with the injector in the pressure mode (cure under pressure) to create an overfill in the void, which compensates for shrinkage and forces a bond onto the PVB. With a crack repair which is surfaced the resin cannot shrink more than 1-2% and must be mechanical enough to stay put upon curing which is the case with  Ultra Bond Crack Repair Resins. The cure of shrinkage and surface tension in cracks was patented by me, Richard Campfield, and is the multi-viscosity Ultra Bond method with the Ultra Bond custom crack resins.

If the surface tension is not dealt with by the repair system/process the resin can separate from the PVB down the road from temperature change and bring back a void between the resin and the PVB even if it is not visible after curing. This void will refract and the repair will no longer pass the  ROLAGS.

UV Cure Speed Slow curing (2-5 minutes) controls shrinkage and residual stress. Curing too fast causes more shrinkage and more stress leading to breaks in the polymer chain, stressed cross-links and stranded molecules. The good news about this is you do not need expensive high-speed curing lights. Ultra Bond uses photoinitiators that cure with Sunlight and inexpensive low watt curing lights which produce a better end product.

  FACTS YOU SHOULD KNOW ABOUT RESIN

Understanding the science behind a windshield break and crack; how a windshield is made and the resins created to fix windshields are important for anyone in the windshield repair industry to know.

This deep understanding of windshield repair chemistry will help you buy better resin and relay to your customer that you are the expert they should trust to repair their safety device.


An  adhesive is a substance that bonds surfaces together. Resin in polymer chemistry is a liquid substance that is convertible into polymers. A polymer is a large molecule and/or many monomers.


A monomer is a small molecule that is able to bond into long chains to identical or different molecules to form a polymer. Resins are a mixtures of monomers and polymers that can be organic or synthetic compounds. The linking up of monomers is called polymerization.


There are two basic types of adhesive bonds- mechanical and chemical.


chemical bond is where the adhesive (resin) has an inter-molecular interaction with the substrate (glass).


mechanical bond is where the adhesive bond is by force and/or by overfilling the space with adhesive and then curing or interlocking mechanically to the surface(s) all without a molecular interaction.


Interaction - the atoms of the resin interacting with the atoms of the glass which creates a chemical bond.


Adhesion - the resins adhesion or bond to the glass. Adhesive strength is the strength of the resin's bond to the glass which can be measured by a lab test. Adhesive failure is when the resin separates from the glass.


Cohesion - the resin's bond to itself. Cohesive strength is needed when there is a gap, such as with an edge crack repair. When there is a gap a higher viscosity-thicker resin will provide more cohesive strength then a low viscosity-thinner resin. Cohesive failure is when the resin pulls apart or splits apart in the middle with resin remaining on the glass.

Here is a monomer:

Here is a polymer: 

Shrinkage is created by the UV acrylic free radical tight knit double-bonding and UV curing is exothermic, meaning it releases heat. When molecules or anything double bonds it shrinks the space it is taking up. Shrinkage creates residual stress within the structure (cured resin). Low viscosity resins shrinks more than high viscosity because of the mixture having more monomer than polymer (oligomer). Oligomer raises the viscosity along with the resins strength, and durability especially when there is a gap such as with an edge crack.


Wetting is when the liquid adhesive is able to maintain contact with the substrate by molecular interaction; meaning the molecules of the resin can link to the molecules of the glass. It occurs because of inter-molecular forces between the resin and the glass surface.


Wicking is the ability of a liquid (resin) to flow into the microscopic crevices and craters on the surface of the glass without the assistance of an outside force such as gravity. Wicking is very important for good adhesion. With windshield chip repair wicking is assisted by both the vacuum and pressure cycle(s) of a windshield repair injector.


LEARN BEFORE YOU UPGRADE TO ULTRA BOND

Introduction To The

Ultra Bond Tool Set


Discover what you've been missing out on with Ultra Bond's complete Wonderbar Tool Set. Our tools gives you the mechanical leverage that you need to make windshield chip repair and windshield crack repair easy. Unlike any other windshield repair vendor, Ultra Bond, designed, manufactured, and lab tested our tools to ensure that you can give your customer an unbreakable repair. Learn how each tool works and how to adapt your tool configuration to help you in any repair situation.


In this video you will learn about these tool configurations:


  1. Crack Master Bridge
  2. Stone/Chip Repair Tool
  3. Long Crack Repair Tool
  4. Star Flexor Setup
  5. Crack Opener


The wonder bar is the latest innovation in windshield repair that allows you to use one, perfectly designed bar, and create 5 different windshield repair tools. Mixing up the configurations and accessories, you can create a Star Flexor, Crack Opener, Stone/chip repair tool, long crack sliding structure, and a crack master bridge complete! Watch as inventor, Rich Campfield of Ultra Bond, quickly and easily assembles the 5 different tools.

Have You Ever Conducted a

Tool Test?


Look Ma,  No Piston!


Can your existing windshield repair tool fix a Star-Break with 100 cps resin with NO piston in the injector ? Watch as Richard demonstrates just how powerful the New Wonder Bar Bridge is. The Bridge replaces vacuuming by an injector and obsoletes manual leg flexing.The holding structure (Bridge) itself flexes open legs so you do not have to manually do it with a probe. Our tools are simple to use and give you mechanical leverage to make a repair a breeze.


In this video you will learn that upgrading your tool set is more than just having another brands tool. What you should take-away from this video are these concepts:


  1. The New Flex and Release method with the Wonder Bar Bridge is more effective than vacuuming with an injector.
  2. Mechanical Leverage by the Bridge opens up the break and the legs and is controllable by the three back bolts.
  3. Size Matters with Windshield Repair Structures
  4. No Resin Waste, Lowest Cost Per Repair in the industry
  5. Let The Tool Do The Work, No more more manually flexing legs.
  6. Make Windshield Long Crack and Chip Repair Fun and Easy.


Ultra Bond Makes windshield chip repair easy for the professionals. With our tools we do right by our customers in making sure you are restoring your customer windshield to pre-factory strength and Stronger Than a New Windshield!

Learn How To Use

The Wondberbar Tool


Can your windshield repair tool easily fix a Star-Break or any other type of windshield chip with 100 cps resin? How about doing this without even having to manually flex legs?


100 cps resin is a structural adhesive. What is a structural adhesive. It is an adhesive that can withstand stress without yielding and can fill a gap between the surfaces. Epoxies are considered structural adhesives. Resins less than about 90 cps are plain adhesives that can bond two surfaces, but cannot withstand stress or fill a gap. Super glue is a plain adhesive. Chip resins which are usually 10 - 45 cps fall into this category.


In this video you will learn that the Wonder Bar Bridge has changed to game for windshield chip repair. This tool has pure compression which opens the break and legs to allow for 100 to 150 cps resin to be used for chip repair. It has also replaced vacuuming with a flex and release method done by the bridge (structure) and eliminates manual flexing of star legs with a probe. Although many in the business call all holding structures a bridge, technically the only ones that are a bridge are those with two suction cups off to both sides of the break. One suction cup  tools and tripods are technically NOT a bridge.


What you should take-away from this video are these concepts:


  1. The Structure is more important than the injector
  2. The reason you have to flex legs with other tools is because of the shape, size and position and durometer of the suction cup(s).
  3. The Ultra Bond structure can flex open the legs itself
  4. You can have complete control regardless of the injector.
  5. This holding structure can do more than any injector.


Ultra Bond makes windshield chip repair fun and you can rest assure that you have restored your customers 3rd most important safety device on their car back to pre-loss condition.

Repair Long Cracks

Over a Foot  Long


Long Crack Repair is structurally and visually superior to chip repairs. The mechanical strength is beyond that of a chip repair and cracks have a better lab test score on distortion, light stability and luminous transmittance. Long cracks do not have the multiple angles of refraction nor the light scatter that the typical star break and  combination break have. The resin that can be injected into cracks with the proper tools is 50 to 100 times thicker than that used in stone-breaks or chips. The ingredient in windshield repair resin that determine its strength and durability is called oligomer. It is thick and raises the viscosity of the resin. Chip resins have little to no oligomer because it would make them too thick to inject into a chip. Not so with a long crack which is surfaced and can be pried open and injected with thick structural adhesive resins as long as you have the proper tools as is shown in the video above.


Over 95% of consumers when told the truth and given their options will choose a long crack repair over a replacement. The Auto Glass Industry's approved American National Standard Institute (ANSI) Standard for long crack repair is 14-inches.


The first successful long crack method was invented and then patented by Richard Campfield in 1989. It is named the Multi-Viscosity Method. This is the one and only method today that can restore windshields back to 100%. This method passed the same Federal Motor Vehicle Safety Standard (FMVSS 205) as a new windshield back in 1993. It has been over 99% successful for over 30 years.


The New Wonder Bar Tools work the same as our previous long crack tools with some improvements with flex and pressure control and a set level for sliding along the crack without pushing down on the glass too much but enough so that you are injecting resin under pressure which helps with interaction between the resin and the glass.


Ultra Bond Makes windshield crack repair easy. You can become a long crack professional with our tools and do right by your customers in making sure you are restoring their vehicle's windshield to pre-factory strength and Stronger Than a New Windshield!

Why Resin Alone Is Not Enough?

WINDSHIELD CRACK REPAIR TRAINING GUIDE

WINDSHIELD CRACK REPAIR TRAINING MENU NAVIGATION

Welcome to this overview of windshield crack repair training and also a close look at Ultra Bond's windshield crack repair kits. In this training guide, you can expect to learn what's actually in our kits and how all the tools work. It's also vital to know some of the back context to windshields and contains must know industry information to help prime your level of understanding when it comes to making a repair in the future.


We'll cover information about which resin to use to handle long cracks and edge cracks. By the end of the training guide you should have enough knowledge about the kits and cracks to start successfully practicing repairs on windshield glass.

DOWNLOAD THE COMPLETE CRACK REPAIR GUIDE

How to Use Windshield Repair Resins and Tools for Crack Repair

Welcome to the Ultra BOND professional windshield repair technicians long crack training manual! We appreciate that you choose us to assist you in achieving your goal to be a successful windshield repair technician. If you have any questions or concerns, call us, we will do all we can to help you.


We recommend you watch our videos before and after reading this manual and go to our On-Line Store and learn the name of each tool and resin in your kit.


As you get out into the field and become familiar with your windshield repair equipment, windshield repair resins and our repair techniques, you will see how easy it is to repair cracked windshields.


This windshield repair kit manual is designed to provide you with the instructions you need to learn the basics of the art and science of glass repair. But remember, this is a hands-on business and the only way to become an expert is to do repairs. Read the instruction manual carefully, and be reassured that if you have any questions, Ultra BOND is here to help.

1-800-398-2663

8:00 a.m. to 4:30 p.m. Mon-Thurs; 8:00 a.m. to 12:00 p.m. Friday

ITEMS YOU WILL NEED IN ADDITION TO YOUR WINDSHIELD REPAIR KIT


  1. Petroleum jelly - (Vaseline) for lubricating suction cups
  2. Glass cleaner - Sprayaway is the best ,it is a white foam.
  3. Cleaning rags
  4. Large towel or mat for protection of the vehicle's hood
  5. Isopropyl (70% -91%) alcohol or acetone - for cleaning your tools
  6. 3M Scotch Tape - this whitish looking tape is made of Mylar.
  7. Cardboard is the best for a sunscreen. Make your own different sizes. Attach two suctions cups to hold it in place on the windshield.
  8. Larger Tool box. If you are going to be mobile your will need a larger tool box. One that will fit Sprayaway glass cleaner and cleaning towels etc.


NOTICE

The only real way to learn about windshield repair is to ACTUALLY DO IT! You should be proficient and comfortable with our windshield crack repair methods after approximately 20 repairs.


You must practice INSIDE a garage. This will allow you time to develop your technique and skills before you work in the sun, which requires that you work quickly.


BEFORE you go out to repair for money, you must first practice. Your name and reputation depend on it. Here are a few ways you can get experience.

  1. Find a junkyard that will allow you to work on windshields in the yard (this way they are still in the vehicle). Create your own, fresh breaks using your bullseye taper and center punch. The existing cracks may be too old and too dirty. To make an edge crack drill one inch from the edge of the windshield, half way through the out layer and tap a bullseye with the needle at a 45 degree angle. You can also use your probe and tap it with the handle of a screw driver. If you are unable to work in the yard, take an old windshield to practice on. The stress on a windshield out of the vehicle is much different than in the vehicle, but you will be able to get the feel of the tools, preparing, drilling and sliding.
  2. Sacrifice your own windshield.
  3. Purchase two or three pieces of laminated glass around 12" X 12" or 24" x 24". Practice drilling and tapping bullseyes on the glass sheets also.
  4. Best Method - Purchase a windshield and two saw horses. Lay the windshield on the saw horses. Using a glass cutter scribe on the side edge about one inch and then split using your hands, thumbs on the underside/innerlite. This will cause an edge-crack. You will get about 12-14 cracks like this from one windshield and by then you will be ready for the real world. You can also make breaks and practice drilling in the center to practice stone-breaks.
  5. At some point you will have to start repairing real breaks on other people's windshield. Start with neighbors, relatives or friends. Once you start with customers you do not have to charge if the repair does not turn out well.


You have to practice and you have to do the repairs. Watching may give you some tips but you cannot be confident in your repairs until you've done them.


Remember that like everything else windshield repair takes practice while learning, but you will make mistakes. A break will spread or you may break a drill bit (sometimes they stay in the glass). The spread can be fixed and the drill bit can remain in the glass if you cannot pull it out (carefully with pliers and pull straight out), it's all in how cool you remain when it happens.

How To Make a Practice Station to Practice and Train Yourself

  • Purchase this saw horse from Harbor Freight for $11.99 (price may vary).


  • Order a 3' X 4 ' piece of flat laminated glass from an auto glass distributor or glass shop.


  • See our videos for how to make breaks and cracks.

SAFETY WARNINGS

  1. DO NOT LOOK AT THE ULTRA VIOLET LIGHT. It can burn the retina of your eyes. Wear 100% UV protective sun or safety glasses whenever you have it turned on and make sure the customer is not within it's range.
  2. AVOID GETTING WINDSHIELD REPAIR RESIN AND ADDITIVES ON YOUR SKIN. The resins contain an acid, which can cause rashes and blistering. Cleanliness is important. Do not allow the resin to drip down your injector. Wear protective polyethylene gloves and/or combine with a protective hand lotion. Wash your hands after each repair.
  3. DO NOT GET WINDSHIELD REPAIR RESIN OR ADDITIVES ON PAINTED SURFACES. The acid will eat the paint. Make sure you have the customer's vehicle well protected.
  4. THIS PROCESS IS NOT FOR COMMERCIAL AIRCRAFT  GLASS.
  5. DO  NOT PERFORM  ANY  REPAIR THAT MAY HINDER THE DRIVER'S LINE OF VISION.
  6. WEAR SAFETY GLASSES for protection against loose glass and resin.

WINDSHIELD REPAIR RESINS

Shelf Life: 3 years at room temperature.


Choosing the proper windshield repair resin for a particular job is a major part of the art and science of windshield repair. Making the right choice will make the windshield repair fast, easy and great looking. Choosing the wrong windshield repair resin can cause trouble while doing the windshield repair and deterioration down the road.


Windshield Repair Resin Safety: We recommend that you wear goggles and gloves when using the resins, additives, pre-treatments, primers and cleaners. Gloves, because some people react to the acid content with continued use, especially in combination with the drying effects of the alcohol used to clean your tools. Ultra Bond carries glove and cotton inner liners. Use your safety goggles provided in your windshield repair kit to protect you from small bits of glass, breaking drill bits, needles or resin.


Windshield Repair Resin Quality & Composition: The Ultra Bond resins are the finest in the business. They do contain an acid because it improves the chemical bonding process to the glass. Windshield Repair Resins without acid will have a considerably lower adhesive strength, as will resins with any contaminant such as pigment used to tint.


CHOOSING A WINDSHIELD REPAIR RESIN:

The underlying basis for choosing windshield repair resin is that you want to use the thickest resin possible, given the circumstances. The circumstances being: temperature and type of damage. Resin reacts to temperature like syrup, when it is warmed, it thins, when it cools, it thickens. Temperature will greatly affect the windshield repair resin you choose for a given damage.


Note: If you see bulls-eyes or combination breaks looking only partially filled after a few months, the resin has shrunk and pulled away from the laminate. The resin used for this repair was too thin or was not cured under pressure.


Low Viscosity Windshield Repair Resins:


Low viscosity (0-90cps) adhesives are for the repair of chips only , not cracks and have three characteristics of concern to repairs:

  1. They shrink when they cure and have no chemical bond to the lamination (PVB).
  2. They shrink in inverse proportion to their viscosity i.e., the thinner the resin, the greater percentage of shrinkage; thin resins shrink more than thick resins; they pull off of the PVB/laminate upon curing and that is why stone-breaks and drilled and tapped bulls-eyes MUST be cured under pressure in order to obtain a forced mechanical bond to the PVB..400 cps and higher viscosity acrylates do not pull off of the PVB upon curing or down the road from exposure.
  3. These resins begin to cure immediately and completely cure in five (5) minutes in direct sunlight.


20 CPS: Our thinnest windshield repair resin and is used for stars, star bursts, and small partial bullseyes. It can be used for all breaks on all stone damage on a cold windshield and is your best choice for star breaks. This windshield repair resin will cause "flowering" on a hot windshield. This resin is also used to remove a "runner" which is a thin line of refraction that you may notice in a long crack. Stone damage resins are compatible; meaning you could start with one resin and change to another stone damage resin if necessary. After you have cured a long crack. 20 cps can also be used to remove any spots you notice in the crack.


40 CPS: Use for bullseye and combination breaks and stars in warm weather. Use 40 cps for a star break if the windshield is hot. This windshield repair resin is thicker than 20 cps. If you have the new Wonder Bar Bridge you can repair most stone-breaks with 90 at room temperature and above and 45 on cold glass. 

PIT FILLER: Use as a large-pit-adapter and a pit-filler. The windshield repair resin you used in the break can also be used to pit-fill and will often last longer because that windshield repair resin has been sitting in the pit and has wet the pit and interacted with the glass and we recommend this method first. If it is not flush after curing and scraping then use the pit filler.


PIT FILLER: Use as a large-pit-adapter and a pit-filler. The windshield repair resin you used in the break can also be used to pit-fill and will often last longer because that windshield repair resin has been sitting in the pit and has wet the pit and interacted with the glass and we recommend this method first. If it is not flush after curing and scraping then use the pit filler.


100 CPS - This is not low viscosity but can be used with the Wonder Bar Bridge. All types of chips can be repaired with our 100 CPS Structural Adhesive windshield repair resin because this windshield repair tool can flex open stone-breaks like no other tool on the market.

How To Talk To The Customer

About the repair


If you are talking to the customer on the phone, find out as much as possible about the break. How did it happen, what caused the break? How large in diameter is the break (use easy references such as nickel, dime, quarter)?


How old is the break?


Once you have determined it is repairable, tell the customer you can repair the crack, which will prevent it from spreading further, and it will remove the light refraction so that the damage will be barely visible. It will look a lot better, but it will NOT completely disappear. Remember you are providing a repair service, not a new windshield. Sell the benefits... prevention of further cracking, saving the OEM windshield which cost 3 times more than the aftermarket windshield their insurance company is going to put into the vehicle, cost savings and safety of preserving the OE Seal which is part of the crash pulse telling the air bag when to go off and can be altered when a windshield is replaced because glass shops most of the time will not look up the urethane used at the factory. This means the modulus will be different and alter the timing of the airbag which will render it useless.

Preparing The Vehicle


  1. Have the customer move the car into the shade, a garage is best, or behind a building. (Do not get into the habit of moving the customer's car unless your liability insurance covers you for this). A tree is not true shade. If there is no shade, face the back of the car towards the sun and place a piece or cardboard on the roof of the car creating a baseball hat effect.. Use something a little heavy to hold it in place and have it wrapped with a towel and taped together so it wil not damage the vehicle if it is blown off by the wind.


  2. Place a thick towel on the hood of the car and place your tool kit on the towel. The towel should drape down and cover anywhere you might lean against      it. Watch out for your belt buckle. We recommend you not wear a belt because will will be leaning against the car.


 3. Carefully wash the area of the windshield around the break. DO NOT SPRAY CLEANER into the break, it will contaminate the repair.

PREPARING YOUR WINDSHIELD REPAIR TOOLS

Wonder Bar Parts and Assembly


In this section you will learn how to assemble the Crack Master Tools into several different tools and different configurations to repair cracks in the windshield. Below is the Wonder Bar Tool Kit which are the components used to create the Crack Master Bridge, Long Crack Slider, Star Flexor, and Chip Repair Tool. Here the cups are the most critical part of the kit that switch your tool and configuration.

Wonder Bar Tool Kit I

Wonder Bar Tool Kit II

How To Assemble The Crack Master Bridge

To assemble The Crack Master Bridge:


  1. (x2) Wonder Bars
  2. (x1) Connector Nut and Bolt
  3. (x2) Soft Two-Inch Suction Cups
  4. (x2) Two One-Inch Stabilizer Bolts
  5. (x1) Pressure Bolt


How To Assemble The Wonder Bar Crack Opener

To assemble The Wonder Bar Crack Opener:


  1. (x2) 2 soft two-inch suction cups
  2. (x1) one 1-1/4 " bolt and nut or 1-1/2 "
  3. (x2) nuts one on each side of the bar or,
  4. Use one nut; the nut MUST be placed upside down, with head on the bottom side, the same side as the suction cups. 


How To Assemble The Long Crack Slider

To assemble The Long Crack Slider:


  1. (x2) 3/4-inch stabilizing bolts with nuts
  2. (x1) Flex/Pressure Bolt
  3. (x1) 2-inch soft suction cup attached with a washer and hex nut
  4. (x1) Wonder bar Nut or
  5. (x1) T-nut on top with the stem going into the nut hole 


  * 6. Continued::: OR - (x1) two-inch Suction Cup Bolt with the (x1) hex-nut on the threads of the suction cup.

How To Assemble Star Flexor

To assemble The Crack Master Bridge:


  1. (x1) 2-inch stiff suction cup.
  2. The two nuts go on both sides of the injector hole, then thread the 1-1/2 bolt through both nuts.
  3. (x1) 1-1/2 inch bolt with two nuts. 
  4. (x1) Attach a wonder bar nut 
  5. (x1) T-Nut on top of the Wonder Bar Nut
  6. Install T-Nut:: With the stem going into the nut hole OR the two-inch Suction Cup Bolt with the hex-nut on the threads of the suction cup.

How To Assemble Single Bar Chip Tool

To assemble The Single Bar Chip Tool


  1. (x1) 3-inch Suction Cup
  2. (x1) metal nut with washer
  3. (x2) 3/4 inch Stabilizing Bolts
  4. (x1) Pressure Bolt


How To Assemble Star Flexor Bridge

To assemble The Star Flexor Bridge:


  1. (x2) Wonder Bars
  2. (x1) Connector Nut
  3. (x1) Connector Bolt
  4. (x2) Stiff Two-inch Suction Cups
  5. (x1) 1-1/2 inch bolt with two nuts.


  1.   * The two nuts go on both sides of the injector hole, then thread the bolt through both nut


How To Prepare Your Injector For a Windshield Crack Repair

Crack Master Bridge Structure

Quick-Turn Injector Piston

Quick-Turn Injector Chamber

Installing O-Rings Onto The Injector Piston

  • Slide title

    Write your caption here
    Button
  • Slide title

    Write your caption here
    Button
  • Slide title

    Write your caption here
    Button

Upon setting up your tool, your Crack Master Bridge, first you must build it. Here we will walk you through step-by-step for making sure the Crack Master is ready for an immediate crack repair. It's critical that you practice setting up and building the Crack Master Bridge, just looking at the videos is not enough, you need to associate what each part does with each other.


Step #1 T
he piston is the first step in setting up your windshield crack repair tool. You will need to assemble the o-rings near the tip of the piston. There are two small o-rings that you will need to install into the grooves.

CAUTION - Do not stretch the red o-rings or they will tear. Very slowly and very carefully roll them into the piston seats.


This helps create the necessary vacuum inside the chamber and the pressure when lowered. If you feel too much drag when the piston goes up and down you can cut the bottom o-ring off and just use one o-ring.

Lubricating The O-Rings

Upon setting up your tool, your Crack Master Bridge, first you must build it. Here we will walk you through step-by-step for making sure the Crack Master is ready for an immediate crack repair. It's critical that you practice setting up and building the Crack Master Bridge, just looking at the videos is not enough, you need to associate what each part does with each other.


Step #1 T
he piston is the first step in setting up your windshield crack repair tool. You will need to assemble the o-rings near the tip of the piston. There are two small o-rings that you will need to install into the grooves.

CAUTION - Do not stretch the red o-rings or they will tear. Very slowly and very carefully roll them into the piston seats. Lubricate new piston O-rings with thicker resin such as 1600, 2400 or pit-filler.


This helps create the necessary vacuum inside the chamber and the pressure when lowered. If you feel too much drag when the piston goes up and down you can cut the bottom o-ring off and just use one o-ring.

Installing Q-Ring Onto The Injector Chamber

  • Slide title

    Write your caption here
    Button
  • Slide title

    Write your caption here
    Button
  • Slide title

    Write your caption here
    Button

To create the necessary vacuum and pressure for the Crack Master Bridge, you need to install the third o-ring onto your vacuum chamber. This o-ring is critical in also creating a meniscus that prevents the windshield resin from leaking out and sucking in air when in the vacuum mode.


Step #3 Seat the third o-ring onto the chamber bottom. In order to do that you will have to push and twist a dry o-ring into the injector chamber seat. It must be dry and the o-ring seat of the cylinder must also be dry. When you are done the o-ring should sit flush. Then twist the injector into the holding structure, but do not go past the bottom of the wonder bar.

Fill Resin & Grease 2 Inch Suction Cups

  • Slide title

    Write your caption here
    Button
  • Slide title

    Write your caption here
    Button

In preparation to start your long crack repair, you will need your tool to be agile and on a windshield you don't want any friction. Use Vaseline, a good amount rubbed into your 2 inch soft cups. You will need a good amount to slide the Crack Master Bridge down the path of a long crack.


Step #4 & 5 Lubricate the suction cups of the bridge with a liberal amount of Vaseline/petroleum jelly for smooth sliding. Also go ahead and take your bottle of resin and squeeze a few drops into the Quick Turn Injector. When doing this make sure you don't push the tip of the resin bottle into the chamber. Just sit the bottle onto the O-ring and squeeze slowly a few drops.

Next..... Setting Up The Crack Master Bridge For The Windshield Crack Repair

Step #6  - Mount the Crack Master on the windshield and center the cylinder over the drilled hole.


Step #7 - Twist the cylinder until the cylinder is flush against the windshield and the bridge is level. The two leveling and stabilizing bolts are set at the right amount of pressure for injecting resin without pushing the crack closed. The (center) pressure bolt is for temporarily increasing the pressure on the resin while injecting crack resin into the drilled hole at the point. Release the (center) pressure bolt off of the glass when you are ready to slide down the crack. Raise the piston (counter clockwise or left) for vacuum and lower it (clockwise or right) for pressure.

Long Crack Windshield Repair Tools

Long Crack Sliding Structure

Crack Master Bridge Structure

Wonder Bar Crack Opener

Quick-Turn Injector Chamber

Long Crack Windshield Repair

Crack repair has been a part of the windshield repair industry since 1990 when Ultra Bond founder Richard Campfield figured it out and was granted patents on what is referred to as 'The Multi-Viscosity Method". Windshield Crack Repair requires more skill, labor, chemicals and tools than the repair of a stone break but not near as much labor and skill as a replacement. You must be efficient at stone damage repair to understand this module. There is no difference in the skill to repair a short crack versus a long crack:


The objective when repairing a crack is to completely fill the crack and break.


The repair should be clear when looking at its profile (45 º angle) and there should be no lines or spots of refraction.


The major difference between repairing a crack versus a stone break where one tool is placed over the impact point and vacuum and pressure is applied, is with crack repair one tool is place at the point of the crack after it has been drilled and a bullseye tapped; another tool will be slid over the crack in order to inject the resin and another tool is placed on the inside to pry open and stabilize the crack.


The most important and critical component of crack repair is the resin and you must do your homework so that you know the resin's properties and use the right resins. You should know the fundamentals of adhesives because windshield repair is all about adhesives.


In a nutshell you repair a crack by:


(1) drilling and tapping a bullseye at the point of the crack;


(2) place a windshield repair tool over the drill hole, vacuum and then place in the pressure mode;


(3) place a crack opener on the inside of the crack approximately two- three inches from the point where your tool is set up injecting resin and turn the bolt to apply pressure and open the crack;


(4) prepare your crack tool and inject the crack by sliding it over the surface of the crack;


(5) Cure the resin and clean the windshield. That is it in a nutshell. Now for the specifics.


There are two types of cracks, a floater crack and an edge crack. 90% of crack repairs will be an edge crack. The edge crack is also the easier of the two.


Edge Crack Windshield Repair

The reason 90% of cracks are edge cracks is because of (a) residual stress and (b) induced stress at the edge of the windshield. As with any adhesive application you must understand the stresses you are dealing with in order to obtain a proper bond. Residual or manufacturing stress is created during the annealing process and causes this area of the windshield to fracture 2.5 times easier than the rest or interior of the windshield. Induced or installation stress is created from gluing the windshield to the vehicle. This stress causes the fracture to crack almost immediately. It is cracking to relieve this stress and it will go 8-12 inches.

Understanding Residual Stress

Residual stress is in the glass and is created during the annealing or cooling process after the glass has been bent and molded and comes out of the oven. The level or magnitude of residual stress can be controlled by controlling the cooling rate through the annealing range to prevent molecules from being pulled apart by the varying rates of cooling occurring at the edge area. This phenomenon causes there to be a perimeter band on the part which is subject to residual tensile stress and is hence the weakest area of the windshield.


It is technically called a "tension bulge". Very quick cooling results in high stress levels while slow cooling reduces the levels and hence increases the time and cost to manufacture the windshield. A band of tension exists just in from the edge. This tensile stress will taper to zero usually 1.5 inches from the edge. This area is called the "Weak Spot" by windshield manufacturer engineers - technically it is called a "tension bulge". It is required by contract with the vehicle manufacturer that an OE windshield not exceed tensile stress of 1000 psi and the edge compression be kept to 1500 psi minimum.


One of the differences between an OE and an ARG is an ARG windshield has no contract limiting these stresses and these stresses can be two times higher in an ARG windshield. OE's are annealed slower which increases the manufacture time and subsequently the cost of the windshield. You should notice when you repair a crack if it is an OE or ARG and also know that the resin you are using can handle this stress without yielding and retain its strength after exposure.

Understanding Induced Stress

Induced stress comes from the installation and is also referred to as installation stress. This is the stress that causes the fracture in the weak spot to crack and is also why nine out of ten cracks will be over six-inches. Because the windshield is being glued to the vehicle at its weakest area the residual stress is both increased in magnitude (200-1500 psi) and expands to about two inches in from the edge. You can feel the induced stress, which can be over 2,000 psi by knocking with your knuckle at the edge and go inward until you feel and hear it change.


Usually four to five inches in. This is the stress your resin must deal with. This stress causes the fracture to split apart (outward or perpendicular to the crack) creating a gap. The stress upon cracking is relived for the time being and then the opposing lamination stress pulls the crack back together usually after is has cracked 10-12 inches and the crack stops.


This is why an edge crack has a wide gap at the edge and at the point it has to be pried open to inject even low viscosity resin. So remember an edge crack has thousands of psi of stress and a gap at the edge and no stress and no gap at the point. The resin used at the edge area therefore needs to have the properties of a structural adhesive.


If the resin does not have the strength to hold the stress at the edge or it loses strength after exposure it will look like the diagrams in The United States Windshield Repair Guidelines.


Working with different temperatures affects the windshield repair resin and can call for alternative resin applications. This is why you need to know the fundamentals of adhesives and the properties of the resin you are using so you can adapt to the situation.

Repairing The Edge Crack

Method A: Meet in the Middle Method #1 for Repairing Edge Cracks

Tools needed:


  1. (x1)  Long Crack Tool Complete
  2. (x1 or 2x)  Crack Opener(s)
  3. (x1) Quick Turn or Yellow Injector or Syringe With 1600 CPS or 2400 CPS for the edge area.


Best Method - This technique allows you to inject the thickest resin possible (the rule of thumb) in the majority of the crack. For this procedure you will need: one injector, one 1600 or 2400 pressure syringe, one Long Crack Repair tool and a Crack Opener. The advantages of this method is you have one cure as you do not have to cure the bullseye at the point under pressure because it has 400 in it.


  1. Drill and tap a bullseye at the point. If the glass is cold prime the point by placing one drop of 45 into the drilled hole.
  2. Mount either Crackmaster tool with your injector filled with the 400 resin at the point. You can use the bridge at the point (the tool two suction cups) with 400 and straddle the crack. Use a liberal amount of petroleum jelly or Vaseline on the suction cup(s) as you will need need to slide the tool - too much is better than too little.
  3. Mount a crack opener on the inside of the windshield about one -two inches from the drilled hole. If you only have one crack opener use a liberal amount of petroleum jelly or Vaseline on the suction cups as you will may need need to slide it. Too much is better than too little. You do not need to slide if you have two crack openers. Two cracks openers will often work better than one and you can use Spray-a-way glass cleaner instead of petroleum jelly to lubricate the suction cups of the crack openers. 
  4. Use the vacuum and pressure process at the bullseye at the point. Now, flex open the crack with the crack opener until you see the 400 start to flow; then stop applying pressure with the crack opener.
  5. Go to the edge and inject edge crack resin (1600 or 2400) appropriate for type of crack and temperature. Starting at the edge where the installation stress has opened the crack up and created a gap use the edge crack pressure syringe to inject 1600 or 2400 and slide toward the middle of the crack unto it stops flowing. It will stop when the lamination stress becomes greater than the installation stress and pulls the crack inward/closed.
  6. Go back to the point and slowly slide down the crack keeping the resin flowing in front of the injector, do not get ahead of the resin. Slide until you meet the edge crack resin in the middle where the edge crack resin stopped. ( If using the Crackmaster bridge structure at the point, straddle the crack and lubricate the suction cups very well.)
  7. Remove all tools. Tab with film tabs or the whitish looking 3M scotch tape and cure. With the Scotch tape you can just throw it away when you are done.

Method B: Edge Crack Repair with One Windshield Repair Structure and One Crack Opener.

Tools needed:


  1. (x1)  Long Crack Tool
  2. (x1)  Crack Opener
  3. (x1) Quick Turn or Yellow Injector or Syringe With 1600 CPS or 2400 CPS for the edge area.


Best Method - This technique allows you to inject the thickest resin possible (the rule of thumb) in the majority of the crack. For this procedure you will need: one injector, one 1600 or 2400 pressure syringe, one Long Crack Repair tool and a Crack Opener. The advantages of this method is you have one cure as you do not have to cure the bullseye at the point under pressure because it has 400 in it.


  1. Drill and tap a bullseye at the point. If the glass is cold prime the point by placing one drop of 45 into the drilled hole.
  2. Mount either Crackmaster tool with your injector filled with the 400 resin at the point. You can use the bridge at the point (the tool two suction cups) with 400 and straddle the crack or the Long Crack Slider with one soft suction cup.  Use a liberal amount of petroleum jelly or Vaseline on the suction cup(s) as you will need need to slide the tool - too much is better than too little.
  3. Mount a crack opener on the inside of the windshield about one -two inches from the drilled hole. If you only have one crack opener use a liberal amount of petroleum jelly or Vaseline on the suction cups as you will may need need to slide it. Too much is better than too little. You do not need to slide if you have two crack openers. Two cracks openers will often work better than one and you can use Spray-a-way glass cleaner instead of petroleum jelly to lubricate the suction cups of the crack openers. 
  4. Use the vacuum and pressure process at the bullseye at the point. Now, flex open the crack with the crack opener until you see the 400 start to flow; then stop applying pressure with the crack opener.
  5. Go to the edge and inject edge crack resin (1600 or 2400) appropriate for type of crack and temperature. Starting at the edge where the installation stress has opened the crack up and created a gap use the edge crack pressure syringe to inject 1600 or 2400 and slide toward the middle of the crack unto it stops flowing. It will stop when the lamination stress becomes greater than the installation stress and pulls the crack inward/closed.
  6. Go back to the point and slowly slide down the crack keeping the resin flowing in front of the injector, do not get ahead of the resin. Slide until you meet the edge crack resin in the middle where the edge crack resin stopped. ( If using the Crackmaster bridge structure at the point, straddle the crack and lubricate the suction cups very well.)
  7. Remove all tools. Tab with film tabs or the whitish looking 3M scotch tape and cure. With the Scotch tape you can just throw it away when you are done.

The impact point of an edge crack will almost always be in the weak spot and is the variable that will determine your repair procedure and time. There are basically two situations with this variable and it is the type of impact you have. It will be a: (a) pin head size chip or (b) star, bullseyes or combination break. Most of the time the impact will be the pinhead size chip and can be ignored. This edge Crack can be repaired in 15-30 minutes and is the easiest crack repair. Here are the steps:


Edge Crack with a pinhead chip impact only. See and follow photos above.


You can ignore this pin head size impact so start by drilling 1/8 of an inch in front of the point and tap a bullseye. You want the point of the crack to terminate into the bullseyes, which will happen when you tap the bullseye. If the crack runs through the bullseye you should drill and tap a bullseye again after you have finished and cured so you will want to be tedious with this step to avoid more work. Mount your tool with 45 or 90 cps, vacuum and pressure twice and leave in pressure mode.


  1. Drill and tap your bullseye 1/8 of an inch in front of the point.


  2. Mount your Crack Master over the drill hole with 400 resin, vacuum and pressure.


  3. Place a crack opener on the inside of the windshield perpendicular to the crack with the bolt on the crack approximately one-two inches from the             point, turn the bolt and watch for the 400 resin to start flowing into the crack and stop, adjust for more pressure as needed. Be careful with a                   hot windshield.


  4. Fill your second injector (or use 1600 or 2400 pressure syringe) with an edge crack resin, hold and seal against the top of the crack by hand and           inject from the edge to the middle at least four inches in. Four inches from the edge has the installation stress in the glass.


  5. Slide the other tool with the 400 resin over the crack to where the edge crack resin stopped i.e. meet in the middle. Always observe the profile of             the crack to watch the resin being injected and do not get ahead of the resin. Note the resin(s) must not spot and cannot shrink upon curing.


   6. Release the crack opener pressure. Always remove the crack opener bolt from the glass before tabbing and curing or you will alter the refractive              index of the resin.


   7. Tab the crack with 2400 and Cure the crack repair


   8. Clean the windshield and you are done.


You must observe and examine the crack from its profile not the head-on angle.

C. Edge Crack with a Break Impact, i.e. Star, Bullseye, Combination break, etc

You CANNOT ignore this impact. Your steps will be the same as above until you come to the impact point with your sliding injector. You will be separating and sealing it so you can repair it just like any other stone break using vacuum and pressure. If you do not seal it you cannot use vacuum and therefore cannot get a complete fill without drilling multiple times. Repair time for this repair is 30-45 minutes


  1. Start by drilling 1/8 of an inch in front of the point and tap a bullseye. You want the point of the crack to terminate into the bullseyes, which will happen when you tap the bullseye. If the crack runs through the bullseye you should drill and tap a bullseye again after you have done and cured the rest of the crack so you will want to be tedious with this step to avoid more work. Place your Wonder Bar Windshield Repair Tool over the drilled hole using 400 cps resin.


  2. Place a crack opener on the inside of the windshield perpendicular to the crack with the bolt on the crack approximately one-two inches from the point;

      turn the bolt to adjust the needed pressure to inject the resin. A second crack-opener next to this one will make injecting 400 resin very easy. Our plastic                crack-opener is low powered and more forgiving and is best used nearest the drilled hole.


  3. Prepare your other injector with 2400 or use the 2400 pressure syringe. Slide on top of the crack from the edge inward and inject 2400 cps, which  is best for        this area of the crack because 2400 will stay on the PVB, holds the installation stress, fills in the gap and will not seep into the break when you go around             it. Observe from the crack's profile the resin going into the crack. Slide over the crack starting from one end and going to the other BUT you must go                       around the impact point and you cannot let  any resin bleed into the bullseye of the break because you are going to separate and seal this area and repair it          separately after curing the crack. The 2400 is best for this purpose.


  4. Release the crack opener pressure. Always remove the crack opener bolt from the glass before tabbing and curing or you will alter the refractive index of

     the resin.


  5. Place a bead of 2400 windshield repair resin and Mylar over the entire crack using 2400 over the entire impact break area. Cover the entire impact break                 with 2400 so that it does not bleed into the break from the impact point or crack.


  6. Remove all tools and cure the crack.


   7. Now you have to repair the impact break. Leave the cured 2400 windshield repair resin over the entire break area and at least ½ inch of both sides so that it         is sealed. Because you have sealed it you can now repair just like any stone break repair. Drill through the resin into the impact point to the PVB. Place your           windshield repair tool over the drilled hole and repair using vacuum and pressure. Cure under pressure. Then pit fill the drilled hole and cure again. Note: All           you have done here is turned the impact into a normal stone damage repair by separating and sealing it.


   8. Clean the windshield and you are done.

E. The Floater Crack

The floater crack is a stone break that was ignored and cracked from temperature change, usually by the defroster, heat, cold or a car wash. This crack is pure negligence by the vehicle owner who should have had the stone break repaired. This crack does not run to the edge and is why it is called a floater crack because it is floating in the interior of the windshield and is usually horizontal.


This is the most difficult and time consuming crack repair. The steps do not have to be followed in order either and can depend on how many tools you have. In fact you may alter the steps after examining the crack and impact point. This crack does not have a gap like an edge crack nor the stress. It is tight and has two points and an impact break, which means you are not only going to repair the crack but have three stone break procedures to perform plus the crack. The impact is almost always a star, bullseye or combination break.


This repair can take 45-60 minutes. Best resin for a floater is 400 cps. Fill as much of the crack as possible with 400 cps. Sometimes you can only get 200 cps in. 


1. One Windshield Repair Tool and One Crack Opener.


  1. Drill and tap a bullseye at the points. Place a tool at the point(s); vacuum and pressure.


  2. Multiple crack openers will make a floater crack repair much easier. If you only have one use Vaseline on the suction cups so you can slide the crack

    opener if necessary. Place a crack opener(s) approximately 1-3 inches from the point(s). Prepare and mount your sliding injector tool and slide along the

    crack.


  3. Go around the impact break and do not let any windshield repair resin seep into the break's bullseye.


   4. If you have only one tool you will need to stop when the windshield repair resin stops injecting near the other point. Cover the entire break area with a

     resin that does not seep into the break (2400) through the impact point, then cure. Do not scrape off


   5. You now have the original break separated and sealed, so that it is repaired just like a normal stone break using vacuum and pressure. Drill through the

      windshield repair resin into the impact point, repair and cure.


   6. Repair the other point just like a stone break and cure.


    7. Scrape off, clean up and you are done.


2. Two Windshield Repair Tools and Two Crack Openers


  1. Drill and tap a bullseye at the points. Place a tool at the points; vacuum and pressure.
  2. Place a crack opener approximately 2-3 inches from each of the points and adjust the pressure bolt.
  3. Prepare and start sliding your injector tool along the crack.
  4. Go around the impact break and do not let any windshield repair resin seep into the break's bullseye.
  5. Cover the entire break area with windshield repair resin that does not seep into the break (2400) through the impact point, then cure. Do not scrape off.
  6. You now have the original break separated and sealed, so that it is repaired just like a normal stone break using vacuum and pressure. Drill through the cured windshield repair resin into the impact point, repair and cure.
  7. Scrape off, clean up and you are done.


3. Easiest Method - Two windshield repair tools and Four Crack Openers.


  1. Drill and tap a bullseye at the points. Place a tool at the points; vacuum and pressure.
  2. Place a crack opener approximately 2-3 inches from each of the points and adjust the pressure bolt and then another one on each side a few inches from the one nearest the tip/point.
  3. Prepare and start sliding your injector tool along the crack.
  4. Go around the impact break and do not let any windshield repair resin seep into the break's bullseye.
  5. Cover the entire break area with windshield repair resin that does not seep into the break (2400) through the impact point, then cure. Do not scrape off.
  6. You now have the original break separated and sealed, so that it is repaired just like a normal stone break using vacuum and pressure. Drill through the cured windshield repair resin into the impact point, repair and cure.
  7. Scrape off, clean up and you are done.


For more repair tips go to our newsletter website Windshield Repair Journal.


E. The Priming Method

Priming a crack can increase the adhesive bond to the glass. It is only necessary when the glass is cold.


There are two general types of repair failures:


  1. Cohesive failure: The resin splits and sticks to the sides or walls of the crack. The appearance is spotty.


  2. Adhesive failure: The resin pulls away from the side(s) of the crack. This type of failure will look as if the crack has never been repaired, and it can be

     re-repaired.


Using our crack resins eliminate cohesive failures.


Inject the edge area of the crack using a primer (45 cps for a cold windshield and 90 cps for a hot windshield). Re-inject the remainder/edge section with a crack resin. Working from the middle toward the edge will push the primer out of the gap better than working from the edge to the point.


LONG CRACK REPAIR PATENT #5,116,441 and CIPs
RESIN = LOWER AT THE POINT THICKER IN THE REMAINDER and EDGE
Low Viscosity High Viscosity
POINT RESINS 90-400
Medium Viscosity -400-800
MIDDLE OF THE CRACK RESINS: 400-800 CPS

LOW VISCOSITY RESINS:

20 CPS: Is a thin, low viscosity windshield repair resin. This windshield repair resin is used to remove a "runner" (covered under Trouble Shooting). 20 cps can also be used to remove any spots you notice in the crack after you have cured it.


PRIMERS & POINT RESINS: All primers and long crack resins are compatible.


45 CPS (PRIMER-POINT RESIN) Is used as a point primer for the drilled hole and tapped bullseye with cold glass. It is compatible with any long crack resin. You should always use a primer in the edge area when the glass is cold or there is slight dust in the crack. You can also use this as a stone damage/chip resin.


90 CPS (PRIMER and POINT) Point resin and can be used for a stone damage repair on a hot windshield or any stone-break with the wonder bar bridge. 


*Primers are compatible with each other and with long crack resins.


LONG CRACK WINDSHIELD REPAIR RESINS:

200 CPS: For use in a floater crack when 400 will not inject. Use above 40 degrees


400 CPS: For use in the point including the drill hole and tapped bulls-eye and the middle section of an edge crack. Also use for a floater crack. Use above 40 degrees.


800 CPS: For use in the middle or edge section of the crack. Use for temperatures 50 degrees or above.


1600 CPS: Use for the edge section of an edge crack which is the first 4 inches from the edge of the windshield. Works best at 70 degrees and above. If used below room temperature, it will need to be warmed or it will not wet the glass well. If you cannot warm the glass, then the edge area (4-5 inches from the edge) should be primed with the 45 resin.


2400 CPS: For use in the edge section of an edge crack which is the first 4 inches of the edge crack when the glass is hot - 85 degrees and above. Prime the edge area first when the glass is below room temperature or cooler with 45 cps. Also use in the edge area when the impact break is a star or combination break in order to separate and seal the break off so it can be repaired after you repair and cure the long crack.


 *Long crack windshield repair resins are all compatible with each other and with the primers.

HELPFUL HINTS:

Always fill the crack with the thickest resins possible.


Compatibility means they can be mixed in the cylinder or injected on top of, or next to, one another. Once a resin is cured, any other resin can be injected or placed next to it.


Heating crack resins or the windshield when below room temperature will increase the bond to the glass.


Injecting a primer in the edge area when the glass is cold and then re-injecting a crack resin in the edge/remainder will increase the bond to the glass by improved wicking and wetting.


1600 AND 2400 cps must be used at or above room temperature or they must be heated. This is done by heating the injector with blow dryer, heat gun or a soldering iron placed in the heating port hole of the injector. A butane solder iron is best if you are mobile.


ALLOW TIME FOR INTERACTION: Allow time for the resin to interact with the glass which is about two minutes. The higher viscosity crack resins you use, the more time this takes. . Using methods that start with an injector at the edge is best as this will allow the interaction time required while doing the repair since these methods can take up to 20 minutes to complete the repair.


CRACK CLEANING: Prime the crack with the Xtra Bond adhesive promoter or the X-Phobic pre-treatment if you suspect there is Rain X. Allow it to evaporate or help it evaporate with a heat gun or blow dryer.

Talk to the Customer

Explain the procedure of the windshield repair, making sure they understand that the windshield repair will not completely disappear. The appearance will improve, the repair will not crack further and it will save them money. Many insurance companies are paying for the repair (discussed further in newsletters at www.windshieldrepairjournal.com ) get information as needed.


Always find out how old the crack is - how long has it been on the windshield.


If the crack is more than 14" in length and has been there for more than 2 months, there is a good possibility that there will be some dirt in the crack that may show up in the repair. Clean the crack (refer to Helpful Hints) and use the priming method, but be sure to pass this information on to the customer.

Preparing The Vehicle

  1. Mobile: Have the customer move the vehicle into the shade. It is a bad habit to get into moving the car unless your liability insurance covers this for you. Remember you need "true" shade. If none is available use cardboard or Artist's board to shadow the windshield. Be sure the board is secured with something heavy, but soft.


  2. Place a thick towel on the hood of the vehicle and place your windshield repair kit on the towel to protect the car's paint from the windshield repair resin,

     and anything on your clothing that may scratch the car.


  3. Wash the area of the windshield around the crack. DO NOT SPRAY CLEANER INTO THE BREAK; IT WILL CONTAMINATE THE REPAIR.

Crack Repair Techniques

Objective: Completely fill the crack, preventing it from spreading any further, while achieving the best possible appearance.


Failures: Generally two types of failures occur with repairs:


1. Cohesive failure: The resin splits and is stuck to the walls or sides of the crack.

The appearance is spotty.


2. Adhesive failure: The resin pulls away from the side(s) or the crack. This type of failure looks as if it had never been repaired before and it can be re-repaired.


The use of our crack resins has eliminated cohesive failures when combined with a good technique. Normally adhesive failures occur in the winter months. The glass becomes cool during a repair even when using a 1600 or 2400 cps and the viscosity of these resins rise, preventing a good wet of the glass. During this season, we recommend the priming method, warm the glass whenever possible and keep your resin warm with a soldering iron placed in the heating port hole of your injector.Randomly check your crack repairs at 3 months, 6 months, 1 year and 2 years to see if you are noticing a cohesive or adhesive failure. If you are, a change in viscosity or method will eliminate the problems. It also lets your customer know you care about he work you did for the long term.

Film Tabs: The following methods of crack repair will require you to know how to use "Film Tabs". When told to do so, generously run resin (a long crack resin) along the area of the crack that has been injected with resin and place the tabs over it, butting them up against each other. There should be no bubbles or places not covered by the resin and tabs.


Methods: "Meet in the Middle" and the "Two-Step" are the most popular. You can use 400 at the point of the meet in the middle method if you prime the drilled and tapped bullseye by dropping one drop of 45 into the drilled hole. Then place your Crack Master with 400 on the drill hole. Turn you crack opener bolt until you see the resin start to go into the crack and then stop. The slowly proceed down the crack until you meet where your 1600 stopped. With 400 in the point you do not need to cure the point under pressure as you have to when you have 45 in the point because 400 is mechanical (thick) enough to stay on the PVB upon curing. There are times when the crack is tight and you will have to use 45 at the point but pick up with the 400 as soon as possible.

Crack Repair Techniques

The Crack Opener is used on the inside of the windshield to pry open the crack. Lubricate the suction cups and mount perpendicular to the crack with the bolt right on the crack about 1-2 inches from the point. Slowly begin to tighten the bolt of the Crack Opener against the crack. You will begin to see the resin start to flow. Stop tightening when this occurs. Multiple crack openers are better than sliding one crack opener along the crack. Proper length with the proper size and durometer of suction cups opens the crack symmetrically and without spreading of the crack..

METHODS FOR REPAIRING SPECIFIC CRACKS (UNSURFACED, "Y" CRACK, CRACK OFF STAR BULLSEYE)

Unsurfaced Crack: Repair using vacuum and pressure.

The unsurfaced crack is very rare. It does not begin or end at an edge of the glass and is therefore also called a "floater".


  1. Drill a hole at one of the points and tap a bullseye.


  2. Prepare your Bridge structure and fill the bullseye with a low viscosity windshield repair resin (45-100 cps) leaving the injector on pressure.


  3. Drill another hole 3-4" down the crack, tap a bullseye and mount your New Style Crack Master and injector also filled with a low viscosity windshiel


  4. repair resin (about 4 drops) and leave it on vacuum. This is creating a pushing and pulling action between the two injectors


  5. When the resin from the 1st Crack Master (Classic) has reached the 2nd Crack Master switch the 2nd Crack Master injector to pressure.


  6. Remove the 1st Crackmaster. Drill another hole 3"-6" down from the 2nd injector and repeat steps 3, 4 and 5.


  7. When completely filled, tab and cure. * A 10" crack would require 3 drill holes.


THE "Y" CRACK


The "Y" Crack may look like a scary repair, but once you think about it as two separate cracks, it becomes quite simple. The "Y" crack off the side or horizontal can be repaired using any repair method. You will repair the bottom crack first stopping when it hits the joining crack and repairing the top section last. If you did the top portion first, you are taking the chance of getting resin into the bottom crack and preventing repair, or making it difficult.


  1. Repair the bottom crack first using any method and a low viscosity windshield repair resin and switching to a medium viscosity windshield repair resin. Stop at the apex or joint of the crack. Tab and cure.


  2. Repair the top crack as you would a normal single edge crack starting with a low viscosity resin at the point, switching to a medium, or high or both,

    depending on temperature. Tab and cure.


If the "Y" Crack is off the bottom, the 2 step works best.


CRACK OFF A STAR OR BULLSEYE


What makes this repair difficult is filling the star or bullseye because you are unable to create a vacuum because the crack has surfaced. Therefore, these instructions focus on filling the star or bullseye. Separating the break as previously instructed above is the best method. Here are some more methods.

  1. If it is a small bullseyes roll a drop of 45 cps into the impact point, it will fill by capillary action while you are working on the rest of the crack.
     
    OR
     
  2. After step 1, take your injector and fill it with 1600 or 2400 cps windshield repair resin and place in the structure. Mount it on the impact point on pressure and let it slowly fill. If the star does not fill, take your probe and flex on each leg of the star that is not filling. Manually pressure pushing and probe flexing simultaneously is fast and works well.
     
    OR
     
  3. Refill the injector with 1600-2400 cps and place on impact point in the pressure mode without the structure. Manual pressure push the resin which should push the low viscosity resin to the tips of the legs.
     
    IF
     
  4. By chance all of the legs of the star still do not fill, continue repair of the long crack and cure. Return back to the legs or areas of the star that did not fill and drill and tap a bullseye. Vacuum and pressure fill. Cure under pressure. Pit fill the drill hole, cure and clean up


REPAIR TECHNIQUE:"INJECTOR SLIDE"


1. The "Injector Slide" does not use the Crack Master structure to hold the injector. Instead, hold the injector in your hand and slide it along the length of the crack as you inject the resin. This technique can only be used when your eye has been trained to see if the crack is open wide enough to allow the resin to enter and completely fill.


2. Use your long crack slider tool but remove the suction cup. Slide it from the edge in toward the point. Use 1600 if the impact point is the typical pinhead size chip. Use 2400 if the impact is a star or combination break. 


WINTER TIME REPAIRS


Wintertime makes long crack repair a delicate operation and because the cracks are surfaced, your resin will be exposed to the atmosphere. Resin will flow into the crevices of the crack most effectively and bond to the glass when at room temperature and above. If the resin gets cold it will not flow into the crevices or bond to the glass as well. Try to heat the glass and use the heating port by placing a soldering iron into the hole in your injector body to keep your resin warm. This will help, but best results are obtained indoors during the cold winter months. Use the Priming method. The Primers flow into the little nooks and crannies while the thick resin adds the cohesive strength. Be sure your windshield repair kit has all the windshield repair resins and windshield repair tools to handle the winter months.


RULES OF THUMB


  1. Always fill the crack with the thickest possible windshield repair resins according to the temperature (check bottle labels).


  2. If mobile, you MUST use true shade.


  3. Take extra care on a hot windshield, it is sensitive and damage spreads easily.


  4. If you have more than one crack or break, work from the bottom up, otherwise resin could drip from the first repair into the second damage curing before

    you can repair it and blocking an easy flow of resin.


  5. Warm a cold windshield slowly with the defroster bringing it to a warm temperature.


   6. If you need to flex on a cold windshield, do the point first. Drill a hole at the point and fill about ½" of the crack and cure. Turn on the defroster and warm

     up the windshield. DO the remainder. This will help prevent the crack from spreading when you flex the glass

Trouble Shooting

Writing down which windshield repair you used as well as weather conditions on all your invoices will assist you in problem solving. Write down any other problems you noticed or were informed about (recently washed or waxed).


1. Refraction line:


There is one problem that can occur in crack repair. "The Runner". This is a thin line of refraction that appears along the bottom of the crack against the lamination (PVB) after the repair is complete. This is generally caused by using a resin too low in viscosity that has shrunk and separated from the PVB during the curing process. Low Viscosity resin has no bond to the PVB and pulls away upon curing. Our 400 resin and higher will not pull off the PVB. The "pulling away" occurs rapidly and spreads (runs) therefore called the "runner". TO REPAIR: Drill into the middle of the runner, tap a bullseye, vacuum/pressure fill with 20 cps resin. Cure under pressure 5-7 minutes, Curing under pressure will force a mechanical bond to the PVB. Fill the pit, cure and clean up.


2. Refraction near point:


Too much pressure with the Crackmaster at the point. Too much pressure can push the crack closed and out of its natural position. The same thing will happen if you forget to remove your Crack Opener before curing.


3. Crack Failure:


  1. Contamination in the crack when it was repaired will reduce the bond and the crack will fail. Prime cracks before you repair with Xtra Bond or X-Phobic.


  2. Windshield repair resin that is cold when it is injected into the crack results in poor wicking (filling of crevices) and compromises the bond. You have

     better control of the temperature if doing repairs inside. Change resin combinations. Try the Priming method. Heat the crack before repairing. Keep the

     resins at room temperature, in a cooler (no ice) during the summer and try a pocket or hand warmer for the winter. Keep your windshield repair kit under

     controlled temperatures as much as possible.


  3. The wrong resin was used in the edge area. 1600 or 2400 cps works best. Change resin combinations. Try the Meet in the Middle method or start

     repairs at the edge and work towards the point.


  4. Windshield repair resin has been through too many changes. Temperatures can be better controlled if indoors if possible. Store at room temperature, in a

     cooler in the summer and try a pocket warmer in the winter. Never leave your windshield repair kit in your vehicle over night.


   5. Solvents were in the crack. Always ask the customer before you start if Rain-X or a similar product was used, or if the car had been recently waxed.


   6. Try cleaning cracks prior to repair with X-Phobic or use a windshield repair resin additive. This may be the only type of failure that cannot be fixed.


Windshield Repair Equipment Cleaning and Maintenance

Piston & Cylinder:


The piston and cylinder should be washed in rubbing (70%) alcohol at least once a week. You do not need to clean after each job. If resin has begun to cure or is sticking to the piston or cylinder, they should soak in alcohol for at least 1 hour.

Use your cleaning brush provided in your windshield repair kit to scrub out the inside of the cylinder. Make sure there is no alcohol on the windshield repair equipment before you begin a repair because the alcohol will contaminate the windshield repair resin. Alcohol is the solvent to windshield repair resin. If resin spills on the customer's paint (which it shouldn't because you have it covered well with a large towel) DO NOT use alcohol, try a little window cleaner. The resin will remove the paint and alcohol will remove wax.'


O-Rings:

Dip them in alcohol and take them out immediately. DO NOT SOAK. O-rings will swell and will not fit properly.


Film Taps:


Film tabs can be re-used. Let them sit in the cleaning jar with alcohol and remove at the end of the day. They can be used quite a few times.


Battery:


Charge at least once a week.


Tool Box and Other Tools:


Clean the inside and outside of your toolbox and other tools regularly. This makes an impression on the customer as well as your own appearance.

Updates, new products, new instructions can be found on our newsletter website: Windshield Repair Journal

Getting Your Windshield Repair Business Up and Running in One Month

1. Domain Name - Go to www.godaddy.com and purchase a domain name. Your domain name would be the keyword that is searched. Best to get www.windshieldrepair_____________.com .The name of your city or town after windshieldrepair. Example www.windshieldrepairgrandjunction.com is our local website. Cost is about $19.00 for a domain name.


2. Hosting Package - Purchase a hosting packing from godaddy for your domain name. Cost is about $50-70 per year.


3. Website - Have Ultra Bond’s web designer build your website and submit it to the search engines. Time is one week – cost is $350.


4. Internet Advertising - Go to yellowpages.com, yellowbook.com, the yellowpage.com. and list your business under windshield repair, windshields and auto glass. Cost is 0. 


5. autoglasssearch.com will place you in multiple websites. You are only charged when someone calls you from that advertisement. $13.50 per call. Call 888-268-2507 or e-mail support@autoglasssearch.com with questions about their advertising service.


6. Google Adwords - Google will walk you through and help you. You control your budget. It can be anywhere from $100 per month to $500 per month. This places your website on the top of the page when someone in your area searches windshield repair.


7. Google Places – almost like your own website with Google. You will show up on maps organically when people search for windshield repair.


8. YouTube – Shoot a video of yourself doing a repair or about your business. Post it on YouTube with keywords that include the name of the town(s) you work and windshield repair, windshield, windshield crack repair, auto glass, glass repair and auto glass repair, etc.


9. Angie’s List – Go to Angieslist.com and register your business and create a profile. This is where many people shop for a credible business. Cost is 0.


10. Craig’s List – Local internet classified advertising.

Networks and Insurance Companies

Filing the Claim for the Consumer - take control, do not let the consumer make this call alone or it will be steered into a replacement and to one of their shops.


Call the claim phone number on the insured's proof of insurance card and follow the prompts. After you call in your first repair you will be in the system and they will fax you tax forms for you to fill out and fax back to them. You are then in the system. You will get paid within about 30 days.

  • LYNX - Fax your invoices to Glass Comp. at (239) 479-6161
  • Safelite - go to www.sgcnetwork.com and fill in the blanks
  • Harmon - fax to the number on the dispatch they fax to you


Have the Assignment of Proceeds printed on your invoice.


Assignment of Proceeds - In consideration of [COMPANY NAME]'s agreement to repair or replace my damaged automobile glass, I hereby assign my auto glass claim and all policy proceeds due me for the glass claim under the terms of my insurance policy to [COMPANY NAME]. Accordingly, I instruct my insurance company to address all issues associated with this claim with [COMPANY NAME] and to pay all amounts amounts directly to [COMPANY NAME]. I authorize my insurance company to release policy, coverage and other information related to this glass claim to [COMPANY NAME]. I agree to pay my deductible, if any, myself. I also agree that if I do not have insurance coverage, I will pay for the work myself.


Getting Paid for Long Cracks - see the newsletter here and/or call Rich Campfield (970) 256-0200

Getting Paid for Long Cracks - see the newsletter here and/or call Rich Campfield (970) 256-0200

Getting Paid For Long Crack Guide - From your customer's insurance company and or agent direct! Never loose another job, Ultra Bond, gives you immense power in the market from the current and ongoing lawsuit against Safelite. Read How Here


Learn How To Close Your Windshield Repair Leads - Discover how to close more of your windshield repair sales calls with this guide directly from Richard Campfield. Become a solid closer and increase your profits days after reading this guide. Read How Here


Contact Information


2458 E. Main Street, B-1, Grand Junction, CO 81501
970-256-0200 (phone)
970-256-1786 (fax)

Company Email

WINDSHIELD CHIP REPAIR TRAINING GUIDE

ULTRA BOND WINDSHIELD REPAIR KIT (specific to kit) CHECKLIST

  • 1 Crack Master
  • 1 Injector with cap
  • 1 Star Flexor
  • 1 UV lamp
  • 1 Probe
  • 1 Mirror
  • 1 Bullseye Tapper with needle
  • 1 Tweezers
  • 1 Screwdriver
  • 1 Center Punch
  • 1 Drill Bits pack (5 in ea. Pack)
  • 1 Cylinder Cleaning Brush
  • 1 Razor Blade Holder
  • 1 O-ring case
  • 1 pk Piston O-rings (12)
  • 1 pk Cylinder O-rings (12)
  • 1 pk 2" film tabs (24)
  • 1 Pressure disk
  • 1 Needle tip injector
  • 1 Spray bottle
  • 1 Cleaning jar
  • 1 Cordless drill / charger/battery
  • 1 Sunscreen
  • 1 UV Glasses
  • 1 Pit Polish
  • 1 ea. Resins: 20, 40
  • 1 Pit Filler / Large Pit Adaptor
  • 1 Xtra Bond
  • 1 X-Phobic
  • 1 Plastic scrubby

ITEMS YOU WILL NEED IN ADDITION TO YOUR WINDSHIELD REPAIR KIT

ITEMS YOU WILL NEED IN ADDITION TO YOUR WINDSHIELD REPAIR KIT


  1. Isopropyl Alcohol (70% -91%) - for cleaning your tools.
  2. Petroleum jelly - (Vaseline) for lubricating suction cups
  3. Glass cleaner -Sprayaway is the best.
  4. Cleaning Rags
  5. Towel or mat for protection of the vehicle's hood
  6. Penlight for examining the repair.

IMPORTANT NOTICE

The only real way to learn about windshield repair is to ACTUALLY DO IT! You should be proficient and comfortable with our stone damage methods after approximately 10-20 repairs. You must practice INSIDE. This will allow you time to develop your technique and skills without any UV bouncing around to cause the windshield repair resin to prematurely cure. BEFORE you go out to repair for money, you must first practice. Your name and reputation depend on it. Here are a few ways you can get experience. 


  1. Purchase a 3' x 4' laminated glass from an auto glass distributor (see practice at the home video) and lay it on a rack or on two sawhorses. Use the center punch in your windshield repair kit to make breaks and practice drilling.


  2. At some point, you will have to start repairing real breaks on other people's windshield. Start with neighbors, relatives or friends. Once you start with

    customers you do not have to charge if the repair does not turn out well.

How To Make a Practice Station to Practice and Train Yourself

  1. Purchase this saw horse from Harbor Freight for $11.99 (price may vary).
  2. Order a 3' X 4 ' piece of flat laminated glass from a glass shop.
  3. See our videos for how to make breaks and cracks.


You have to practice and you have to do the repairs. Watching may give you some tips but you cannot be confident in your windshield repairs until you've done them. Using the center punch in your windshield repair kit, press it against the glass until it clicks.


This will make a stone break. Remember that like everything else windshield repair takes practice while learning, but you will make mistakes. A break will spread or you may break a drill bit (sometimes they stick in the glass). The spread can be fixed and the drill bit can be removed from the glass, it's all in how cool you remain when it happens. 


SAFETY WARNINGS

  1. DO NOT LOOK AT THE ULTRAVIOLET LIGHT. It can damage the retina of your eyes. Wear 100% UV protective sun or safety glasses whenever you have it turned on and make sure the customer is not within its range.


  2. AVOID GETTING WINDSHIELD REPAIR RESIN AND CHEMICALS ON YOUR SKIN. The resins contain an acid(s), which can cause blistering. Cleanliness is

    important. Do not allow the resin to drip down your injector. Wear protective polyethylene gloves and/or combine with a protective hand lotion. Wash your

    hands after each repair.


  3. DO NOT GET WINDSHIELD REPAIR RESIN ON PAINTED SURFACES. The acid will eat the paint. Make sure you have the customer's vehicle well protected.


  4. THIS PROCESS IS NOT FOR COMMERCIAL AIRCRAFT GLASS.


  5. DO NOT PERFORM ANY WINDSHIELD REPAIR THAT MAY HINDER THE DRIVER'S LINE OF VISION.


  6. WEAR SAFETY GLASSES for protection against loose glass and resin.

Windshield Repair Resin

Shelf Life: 3 years at room temperature. Choosing the proper windshield repair resin(s) for a particular job is a major part of the art and science of windshield repair. Making the right choice will make the windshield repair fast, easy and great looking. Choosing the wrong windshield repair resin can cause trouble while doing the windshield chip repair and deterioration down the road.


Windshield Repair Resin Safety: We recommend that you wear glasses, gloves or hand protectant lotion when using the resins. Gloves, because some people react to the acid content with continued use, especially in combination with the drying effects of the alcohol used to clean your tools. Ultra Bond carries glove and cotton inner liners. Use your safety glasses provided in your windshield repair kit to protect you from small bits of glass, breaking drill bits, needles or resin.


Windshield Repair Resin Quality & Composition: The Ultra Bond windshield repair resins are the strongest and most durable resins in the windshield repair business. This is been proven in lab tests, in court, and in the real world. (See our home page.)They do contain a small amount of acid because it improves the chemical bonding process to the glass. Windshield repair resins without acid will not sustain the stress of temperature extremes. The underlying basis for choosing windshield repair resin is that you want to use the thickest resin possible, given the circumstances. Water thin resins will have considerably lower cohesive strength, as will windshield repair resins with any contaminant such as pigment used to tint. All of Ultra Bond resins are moisture resistant -this is why no dry-vac is necessary; we use chemistry instead of time-consuming hardware.

Choosing a Windshield Repair Resin

Windshield chip repair resins are compatible; meaning you could start with one resin and change to another stone damage resin if necessary. 

Windshield Repair Resins For Stone Damage

 Chip repair resins are low viscosity (0-90 cps) adhesives and have three characteristics of concern to our repairs:


  1. Low viscosity resins shrink when they cure.
  2. They shrink in inverse proportion to their viscosity., ie., the thinner the resin, the greater percentage of shrinkage; thin resins shrink more than thick resins.
  3. These resins begin to cure immediately and completely cure in five (5) minutes in direct sunlight.


Note: If you see bullseyes or combination breaks looking only partially filled after a few months, the resin has shrunk and pulled away from the glass or laminate. The resin used for this repair was too thin or you did not cure under pressure. You will rarely see this on the legs of a star break because space is so minute.

Understanding Windshield Repair Resins

20 CPS: Our thinnest windshield repair resin and is used for stars, starbursts, and small partial bullseyes on cold glass.


It can be used for all breaks on all stone damage on a cold windshield and is your best choice for a star burst. This windshield repair resin will cause "flowering" on a hot windshield.


This resin is also used to remove a "runner" which is a thin line of refraction that you may notice after you have cured a long crack. 20 cps can also be used to remove any spots you notice in the crack.

40 CPS: Use for all stone-breaks - stars, bullseyes and combination breaks.


Use 40 cps on a star break if the windshield is room temperature. This resin is thicker than 20 cps.

45 CPS: Use for all stone-breaks -large combination damages, stars or bullseyes .


It can also be used as a pit filler for smaller impact points and on plate glass repairs.

PIT FILLER: Use as a large-pit-adaptor and a pit-filler.


The windshield repair resin you used in the break can also be used to pit-fill and will often last longer.


That's because resin has been sitting in the pit and has wet the pit and interacted with the glass and we recommend this method first.


If it is not smooth after you scrape then pit fill again using the pit filler.

Windshield Repair Resin Quick Reminder Chart

  1. Use the thickest resin possible given the circumstances. The Wonderbar Bridge can repair all stone-breaks with 90-100 cps resin at room temperature and above.


  2. The circumstances are the temperature and type of damage. You can use a thicker resin in colder temperatures if you increase the temperature of the windshield and resin during the repair. Heat the injector with a heat gun or blow dryer to heat the resin or use a soldering iron in the injector heating hole.

Type of Damage

Temperature ranges for resin Cold (under 50) Moderate (over 50) Hot (80-up)
Star 20 cps to 45 cps 45 cps to 90 cps 90 - 100 cps
Bullseye 45 cps 90 - 100 cps 90 - 100 cps
Combination 45 cps 45 cps* to 100 cps* 45 cps* to 100 cps*
Large Combination 45 cps 45 cps* to 100 cps* 45 cps* to 100 cps*

*Combination breaks and large combination breaks can be repaired using two stone damage resins. The thinner resin is injected first and is probed to fill the tips of the legs as far as possible. The injector is placed on vacuum cycle, removed and thicker resin is put in. Then the second resin is injected to fill the large impact area, which pushes the thinner resin to the tips of the legs. This reduces the likelihood of shrinkage related problems. Note: This method is not needed with the WonderBar tools. The Star Flexor Tool can be used instead of using the first resin as this tool flexes the legs open and holds them open until they are filled. This method is also not needed with the Wonderbar Bridge because it opens the break up to allow easy flow of thicker resin.

Identification Of Different Stone Chips

It is important that you develop the vocabulary of the windshield crack repair industry so you can think in windshield repair terms. It also helps you to communicate with us when you need assistance.

Bullseye Windshield Break

Bullseye is the easiest repair to perform and rare due to the fact that windshields are not as heavy as they were in the early 50s, 60s, and 70s.


However, if there is not a small circle in the chip, you will have to create one. This leads to one of the most important skills you will need to practice to master, and that is drilling. To be a windshield chip or windshield crack master, you will have to master drilling.


* For a partial bullseye - see Drilling section and appendix.

Bullseye Chip Windshield

Combination Chip, this break is a combination; a bullseye with a star break in the center. It is more visible after the repair than the other types of breaks listed above because the legs are at many angles.


When there are extended cracks running past the bullseye horizontally the tips should be drilled, a bullseye tapped and filled to prevent these legs from running.

Star Chip Windshield Break

Star Chip, is the break to concentrate on. Drilling may be necessary and the repair must be done carefully to prevent further spreading of the cracks.


This break will often need more than just vacuum and pressure to completely fill each leg. The Star Flexor in your windshield repair kit will help achieve complete filling of each leg.

COMBINATION BREAK: This break is a combination; a bullseye with a star break in the center. It is more visible after the repair than the other types of breaks listed above because the legs are at many angles. When there are extended cracks running past the bullseye horizontally the tips should be drilled, a bullseye tapped and filled to prevent these legs from running.


BEFORE STARTING: It is important for you to know the basic construction of a windshield so that you also understand how the repair is performed with a glass repair kit. This knowledge will give you more confidence when speaking to your customer. Car windshields are constructed of two separate sheets of glass with a thin layer of plastic called PVB (the laminate) in between. This type of construction is known as "laminated glass" or "safety glass". When a break results in the glass (usually caused by a small stone ), it creates an air gap between the layers, light bounces around inside the air space, causing the break to be visible. It also creates a weak spot in the glass which, if not repaired, will crack further due to temperature changes that cause contraction and expansion of the glass. With the Ultra BOND method of glass repair, the air gap is filled with an optically clear resin that removes the refraction (light bounce). The resin bonds to the surrounding glass preventing it from spreading. Some things that could prevent a quality repair are dirt, moisture, Rain-X or similar products.


Head-On Angle and the Profile: Each leg or crack in a break has a head-on angle and a profile. You must know the difference. The profile is the side of the crack (45-degree angle) and is the angle you watch to see the resin fill. The head-on angle does not change and will always be there. You cannot tell if the resin is filling the break if you are looking at the head-on angle. See The United States Windshield Repair Guidelines for diagrams of the head-on angle and profile of the crack and follow those guidelines when the break is in the acute area.


TALKING TO THE CUSTOMER: About the repair If you are talking to the customer on the phone, find out as much as possible about the break. How did it happen, what caused the break? How large in diameter is the break (use easy references such as nickel, dime, quarter)? How old is the break? Once you have determined the stone damage is repairable, tell the customer you can repair the break, which will prevent it from spreading further, and it will remove the light refraction so that the damage will be barely visible. It will look a lot better, but it will NOT completely disappear. Remember you are providing a repair service, not a new windshield. Sell the benefits... prevention of further cracking and the cost savings.


Preparing The Vehicle

  1. Have the customer move the car into the shade, a garage is best, or behind a building. (Do not get into the habit of moving the customer's car unless your liability insurance covers you for this). A tree is not true shade. If there is no shade, face the back of the car towards the sun and place a piece of cardboard on the roof of the car. This will shade the entire windshield.


  2. Place a thick towel on the hood of the car and place your tool kit on the towel. The towel should drape down and cover anywhere you might lean against

     it. Watch out for your belt buckle.


  3. Carefully wash the area of the windshield around the break. DO NOT SPRAY CLEANER into the break, it will contaminate the repair.

     WINDSHIELD REPAIR PROCEDURE All windshield repairs, stone damage, and cracks begin with these initial steps. The actual repair does not start until

     after the second pressure cycle. Everything before is just preliminary. The quicker the technician becomes at getting to that second pressure cycle, the

     quicker all repairs will go. 1. Assess the damage: Consider how will you repair it, what will you expect it to look like upon completion?

Windshield Chip Repair Procedure

All windshield repairs, stone damage, and cracks begin with these initial steps. The actual repair does not start until after the second pressure cycle. Everything before is just preliminary. The quicker the technician becomes at getting to that second pressure cycle, the quicker all repairs will go.


Step #1 - Assess the damage: Consider how will you repair it, what will you expect it to look like upon completion? 


Step #2 - Place mirror on the inside of the windshield so that you can see the break.


Step #3 - Determine location and profile of legs (star break).


Step #4 - Determine if wet, or if the windshield needs to cool.


Step #5 - Is the impact point very large? If so do the large pit procedure first.


Step #6 - Wearing your safety glasses, probe the impact point. Take the sharp point of your probe and in a circular motion move around inside the impact

     point removing any little chips of glasses or dirt. This will clear the path for the resin to flow. If there is no bullseye then you will be drilling.


Preparing Your Windshield Repair Tools

Wonder Bar Tool Kit I

Wonder Bar Tool Kit II

In order to assembly the Chip Master Windshield Bridge Structure, you will need the Wonder Bar Tool Kit. Please see the menu above or link below to access the Crack Master Tool Parts!

How To Assemble The Chip Master Bridge Structure

  • Slide title

    Write your caption here
    Button
  • Slide title

    Write your caption here
    Button
  • Slide title

    Write your caption here
    Button
  • Slide title

    Write your caption here
    Button
  • Slide title

    Write your caption here
    Button
  • Slide title

    Write your caption here
    Button

To assemble The Crack Master Bridge:


  1. (x2) Wonder Bars
  2. (x1) Connector Nut and Bolt
  3. (x2) Soft Two-Inch Suction Cups
  4. (x2) Two One-Inch Stabilizer Bolts
  5. (x1) Pressure Bolt


* See the Crack Master Tool Parts for Wonder Bar Parts & Assembly, and to see photos of bolts and cups.


How To Assemble The Long Crack Slider

  • Slide title

    Write your caption here
    Button
  • Slide title

    Write your caption here
    Button
  • Slide title

    Write your caption here
    Button
  • Slide title

    Write your caption here
    Button
  • Slide title

    Write your caption here
    Button
  • Slide title

    Write your caption here
    Button

To assemble The Long Crack Slider:


  1. (x2) 3/4-inch stabilizing nut and bolts
  2. (x1) 1-1/2 inch bolt with two nuts.
  3. (x1) Pressure Bolt
  4. (x1) 2-inch soft suction cup attached with a
  5. (x1) Wonder bar Nut and
  6. (x1) T-nut on top of the nut with the stem going into the nut hole 


 * 6. Continued::: OR - (x1) two-inch Suction Cup Bolt with the (x1) hex-nut on the threads of the suction cup.

How To How To Assemble Star Flexor

  • Slide title

    Write your caption here
    Button
  • Slide title

    Write your caption here
    Button
  • Slide title

    Write your caption here
    Button
  • Slide title

    Write your caption here
    Button
  • Slide title

    Write your caption here
    Button
  • Slide title

    Write your caption here
    Button

To assemble The Star Flexor:


  1. (x1) 2-inch stiff suction cup The two nuts go on both sides of the injector hole, then thread the bolt through both nuts.
  2. (x1) 1-1/2 inch bolt with two nuts.
  3. (x1)
  4. (x1) Attach a wonder bar nut 
  5. (x1) T-Nut on top of the Wonder Bar Nut
  6. Install T-Nut:: With the stem going into the nut hole OR the two-inch Suction Cup Bolt with the hex-nut on the threads of the suction cup.

How To Assemble Single Bar Chip Tool

  • Slide title

    Write your caption here
    Button
  • Slide title

    Write your caption here
    Button
  • Slide title

    Write your caption here
    Button
  • Slide title

    Write your caption here
    Button
  • Slide title

    Write your caption here
    Button
  • Slide title

    Write your caption here
    Button

To assemble The Single Bar Chip Tool


  1. (x1) 2-inch Stiff Suction Cup
  2. (x1) attached with Wonder Bar Nut
  3. (x1) and T-nut
  4. (x2) 1-inch Stabilizing Bolts
  5. (x1) Pressure Bolt


  OR


  1. (x1) 3-inch Suction Cup
  2. (x1) Wonder Bar Nut
  3. (x1) T-Nut on top of the Wonder Bar Nut
  4. (x2) 1-inch Stablizing Bolts
  5. (x1) Pressure Bolt.

How To Assemble Star Flexor Bridge

  • Slide title

    Write your caption here
    Button
  • Slide title

    Write your caption here
    Button
  • Slide title

    Write your caption here
    Button
  • Slide title

    Write your caption here
    Button
  • Slide title

    Write your caption here
    Button

To assemble The Star Flexor Bridge:


  1. (x2) Wonder Bars
  2. (x1) Connector Nut
  3. (x1) Connector Bolt
  4. (x2) Soft Two-inch Suction Cups
  5. (x1) 1-1/2 inch bolt with two nuts.


  * The two nuts go on both sides of the injector hole, then thread the bolt through both nutTo assemble The Star Flexor Bridge:

How To Prepare Your Injector For a Windshield Crack Repair

Crack Master Bridge Structure

Quick-Turn Injector Piston

Quick-Turn Injector Chamber

Installing O-Rings Onto The Injector Piston

Upon setting up your tool, your Chip Master Bridge, first you must build it. Here we will walk you through step-by-step for making sure the Chip Master Bridge is ready for an immediate crack repair. It's critical that you practice setting up and building the Chip Master Bridge, just looking at the videos is not enough, you need to associate what each part does with each other.


Step #1 Recognizing the piston is the first step in setting up your windshield chip repair tool. You will need to assemble the o-rings near the tip of the piston. There are two small o-rings that you will need to install onto the grooves. This helps create the necessary vacuum inside the chamber.


CAUTION - Do not stretch the red piston o-rings or they will tear. Very slowly and very carefully roll them on without stretching. Always lubricate them well with resin before inserting and carefully insert into the cylinder. Once in they will last for over one hundred repairs.

Lubricating The O-Rings

Upon setting up your tool, your Chip Master Bridge, first you must build it. Here we will walk you through step-by-step for making sure the Chip Master Bridge is ready for an immediate crack repair. It's critical that you practice setting up and building the Chip Master Bridge, just looking at the videos is not enough, you need to associate what each part does with each other.


Step #1 Recognizing the piston is the first step in setting up your windshield chip repair tool. You will need to assemble the o-rings near the tip of the piston. There are two small o-rings that you will need to install onto the grooves. This helps create the necessary vacuum inside the chamber.


CAUTION - Do not stretch the red piston o-rings or they will tear. Very slowly and very carefully roll them on without stretching. Always lubricate them well with resin before inserting and carefully insert into the cylinder. Once in they will last for over one hundred repairs.

  • Slide title

    Write your caption here
    Button
  • Slide title

    Write your caption here
    Button
  • Slide title

    Write your caption here
    Button
  • Slide title

    Write your caption here
    Button

Installing O-Ring Onto The Injector Chamber

To create the necessary seal and vacuum for the Crack Master Bridge, you need to install the x-ring onto your vacuum chamber. This o-ring is critical in also creating a meniscus that prevents the windshield resin from leaking out.


Step #3 - Seat the third o-ring onto the chamber. In order to do that you will have to push and twist the o-ring onto the injector chamber seat. Both the seat and x-ring must be dry. Twist the injector into the holding structure, When you are done the o-ring should sit flush.

  • Slide title

    Write your caption here
    Button
  • Slide title

    Write your caption here
    Button

Fill Resin & Grease 2 Inch Suction Cups

In preparation to start your long crack repair, you will need your tool to be agile and on a windshield you don't want any friction. Use Vaseline, a good amount rubbed onto your 2 inch soft cups. You will need a good amount to slide the Crack Master Bridge down the path of a long crack.


Step #4 & 5  - Lubricate the suction cups of the bridge with a liberal amount of Vaseline/petroleum jelly for smooth sliding. Considering the size of the damaged the average break will use 1-2 drops of windshield repair resin, place 10-15 drops of windshield repair resin into the cylinder, which is enough for 7-12 repairs, place the large o-ring on the bottom of the cylinder until the o-rings are in the seat of the cylinder bottom.


Place the cylinder o-ring on the cylinder, then place the tip of the bottle in the hole and squeeze resin into the injector -see the videos for more filling information.

Set Resin Flush With The Injector O-Ring

Now it's time to get your tool ready to be applied onto the glass. In order to get a good injection you want to avoid letting air get added to the mix. So what we want to do is bring the resin inside the chamber flush with the o-ring.


Remember, this is an important step to get right, also don't worry about the resin coming out. The Quick Turn Injector assembled creates the vacuum to keep the resin into the tool.


Step #6 - Bring the windshield repair resin up to the O-Ring so to remove all the air from the cylinder, until it touches the O-Ring. This will prevent the resin from spilling out when you turn it over to mount it.

  • Slide title

    Write your caption here
    Button
  • Slide title

    Write your caption here
    Button

Place The Crack Master Bridge On The Glass

After setting the resin, you want to flip the Crack Master Bridge top side up and ready to place the injector over the impact point of the stone break.


The goal here is to place the tool onto the glass, make sure you have your mirror under the break so you can aim and place the injector right over the impact point.


Step #7 - Mount the Crack Master on the windshield and center the cylinder over the impact point. Push the cups securely onto the glass. The tool should have the appearance of being set onto the glass. Twist the cylinder and the leveling screw in the back until the cylinder is flush against the windshield and the bridge is level. NOTE: The Leveling Bolt should contact the glass first so the resin does not spill out of the cylinder.

How To Prepare Your Injector For a Windshield Crack Repair

Objective: To completely fill the break with windshield repair resin using as little pressure as possible.


Method: Vacuum and Pressure. This method is achieved by turning the piston head counter-clockwise for vacuum and clockwise for pressure. 

Vacuum and Pressure Method

After setting the resin, you want to flip the Crack Master Bridge top side up and ready to place the injector over the impact point of the stone break.


The goal here is to place the tool onto the glass, make sure you have your mirror under the break so you can aim and place the injector right over the impact point.


Step #8 - Mount the Crack Master on the windshield and center the cylinder over the impact point. Push the cups securely onto the glass. The tool should have the appearance of being set onto the glass. Twist the cylinder and the leveling screw in the back until the cylinder is flush against the windshield and the bridge is level. NOTE: The Leveling Bolt should contact the glass first so the resin does not spill out of the cylinder.


Injecting Resin Into Impact Point On Pressure

The initial placement of the windshield chip master bridge onto the glass and hovering over the impact point you will your piston will be in the down position and thus the initial injection of resin will flow into the impact point.


Repairing On Pressure is a critical point here; when setting up your tool, make sure that follow the initial placement of the tool is hovering over the impact point. This will enable you to inject directly into the impact point. Also make sure your Wonder Bar is level with the injector and pressure bolt.


Step #9 - Pressure for 10 seconds by twisting the piston head clockwise a few turns. You will see windshield repair resin begin to flow into the break. Use enough pressure to get the o-ring to rise slightly. Leave the piston on pressure for about 30 seconds. Note: the piston is down.

Wicking Is Key, Vacuum Again For 15 Secs

As described in our "Why Ultra Bond Resin" section of our website, what sets our tools apart from the competition has to do with getting the best possible bond.


In order to do that, there's an extra step where you need to wick the resin to get the order with the resin polymers. When cured this chip repair will form a very strong bond!


Step #10 - Vacuum again for 10-15 seconds to increase wicking. Pressure until completely filled. Leave the tool in this mode and check your break to be sure it has completely filled.


See picture below is almost filled. For a star break, you will need to check the profile of each leg. If the break is not filled, please see the next section "Techniques to completely fill the break" and the video on the video page.

  • Slide title

    Write your caption here
    Button
  • Slide title

    Write your caption here
    Button
  • Slide title

    Write your caption here
    Button

Close Up, After Wicking and On Pressures

Check your break to be sure it has completely filled. See picture below is almost filled. For a star break, you will need to check the profile of each leg. If the break is not filled, please see the next section "Techniques to completely fill the break" and the video on the video page. 


When you have successfully reapplied the resin into the impact point from wicking, you will notice the resin fill the the chip and by applying enough pressure as mentioned above you will notice the o-ring push up. You will also notice the resin filling up all the way into the legs.


Use your mirror and look closely to watch the resin fill the legs. Once the time limit is reached and you take your Quick Turn Injector off pressure as well as taking the pressure bolt off pressure he chip will close up.

  • Slide title

    Write your caption here
    Button

Curing While On Pressure

This is the first of two cures you will do to restore the vehicles pre-loss windshield condition.


Cure your glass repair using your ultraviolet light provided in your windshield repair kit for two minutes while keeping the tool in the pressure cycle.


ALWAYS CURE IN THE PRESSURE CYCLE TO COMPENSATE FOR SHRINKAGE AND TO BOND TO THE PVB/LAMINATE. 

  • Slide title

    Write your caption here
    Button

How To The Remove Chip Master Bridge

Before removing the tool loosen slightly the leveling bolt, cylinder and turn the piston counter-clockwise 1/2 turn into the vacuum mode to prevent spilling resin.


Remove the holding structure by sliding your small screwdriver under the suction cups to pop them off.


Turn the crack master upside-down, wipe the cylinder bottom with a rag and place the injector cap on to protect the resin from UV and prevent leaking of unused resin.

  • Slide title

    Write your caption here
    Button

Applying Pit Filler or Resin To Impact Point

After curing on pressure, you will want to make sure to add a drop of pit filler or resin (just a drop) to fill the small pit or crater in the windshield.


Small pits or drill holes can take any resin. Larger pits need pit filler, 1600 or 2400.


Pit Fill by leaving a drop of the windshield repair resin you used in the repair or by placing a drop of your pit filler above the impact point and allowing it to roll into the impact point (this prevents air bubbles) and cover with a film tab. Be sure no bubble has been created under the tab. 

  • Slide title

    Write your caption here
    Button

The Final Curing Of Windshield Repair Resin

When you have successfully reapplied the resin into the impact point from wicking, you will notice the resin fill the the chip and by applying enough pressure as mentioned above you will notice the o-ring push up.


You will also notice the resin filling up all the way into the legs.


It's important to remember to let this sit for at least 5 mins to let the resin get into the pockets and legs. Don't get impatient!


Use your mirror and look closely to watch the resin fill the legs.


Once the time limit is reached and you take your Quick Turn Injector off pressure as well as taking the pressure bolt off pressure he chip will close up.er the tab. 

  • Slide title

    Write your caption here
    Button
  • Slide title

    Write your caption here
    Button
  • Slide title

    Write your caption here
    Button

Scraping Dried Resin Using a Razor Blade

Using a fresh razor blade, scrape off the excess resin by holding the blade at a 90- degree angle. DO NOT SLICE IT OFF because this could pull resin out of the impact area. It should feel smooth when you are done. If it does not, repeat the Pit Filling steps 8 and 9 and 10 and try again. 


Polish the pit. Shake up your bottle of pit polish and apply a small drop to the damage. Attach your polishing wheel and buff to your satisfaction, adding more polish if necessary.


Note: An easier way to have a clear pit is Spray Away glass cleaner. Spray on the pit before scraping and keep the pit wet the entire time you scrape.


Note:  Fresh razor blades leave a smoother less noticeable blemish 

  • Slide title

    Write your caption here
    Button

Cleaning The Windshield, Use Spray Away

Clean the entire windshield. (It's the extras that make a big difference).


Repair Tip #1 - Technique to prevent any waste of resin. Cure under pressure, then loosen the leveling bolt and injector cylinder slightly. Then loosen the piston by turning it 1/4 to 1/2 turn counterclockwise, slide the screwdriver under the suction cups to remove from the glass. Turn your tool upside down and place the cap on the injector. There will about 1/2 drop if resin in the pit. You can use that resin for a pit-filler if the impact chip was small. 


Repair Tip #2 - To probe more efficiently and quickly, go around once and flex (push on the leg with the probe) all legs of the star break to see which are filling and which are not. Concentrate on the ones that appear to be filling first because probing these will often help the others open and fill. Go to each leg in turn and flex probe until filled. If a star break has multiple legs and all but a few fills, you may need to drill them. 

Techniques To Completely Fill The Chip Break

Many times just vacuum and pressure cycles will not completely fill the break. The following are different techniques that when properly used, will make you the best.


Learn them all. See our video page.


  1.   Piston Pressure: Increase pressure by twisting the piston clockwise. Be careful not to "flower" the break and be careful if the windshield is hot.


  2. Flexing: Flexing opens the crack (or legs of the star breaks) up wider allowing the windshield repair resin to flow, overfilling the break so that when you

    release the pressure you have applied with your screwdriver or the Star-Flexor, the break closes back up and the resin will move closer to the tips. How to

    flex: Take your screwdriver or Star Flexor Tool in your windshield repair kit and push on the leg of the star break that is not filled until you see resin crawl

    further up the tips. Press and hold until leg is filled. Push at the base of the leg first and ease out towards the point or end of the leg.


     BE EXTREMELY CAREFUL DOING THIS ON A HOT WINDSHIELD. You could cause the leg to crack further. You can usually press harder on a cold windshield. 


4. Manual Pressure Pushing: While in the pressure cycle, take your thumb or finger and gently press on the piston, easy does it. Press and release, press and

   release. Watch the resin move and fill the break. ALWAYS press gently.


5. Pressure Pushing and Flexing: Simultaneously doing manual pressure (#3) and flexing (#2) is very effective and fast.


 6. Bridge Pressure: Twist the cylinder, the leveling screw, or both. This will flex the glass which opens the break and puts more pressure on the resin when in the pressure cycle.


  Drill: When all else fails to cure, then go back and drill the unfilled section, leg or tip. This is covered in the next section.

Drilling

To Drill or Not to Drill?

The drill is your best friend. The better you drill, the better technician you will be.


When to drill:


1. Look to see if there is a black circle underneath the impact point. If there is, you will most likely NOT need to drill. This black circle is the bullseye of the break. If there is not one, you will drill and create one. The bullseye indicates that there is a space/passageway that will allow the resin to flow into the break.


2. Another way to determine whether or not to drill is to put one drop of 20 cps on the impact point. If you notice it seeping into the break, you do not need to drill.


Many damages will require drilling and through experience and practice, you will learn how to tell when you should or won't have to, just by glancing at the break.


Objective: Drill the smallest, most inconspicuous hole possible

Setting Up the Drill:


Loosen the head of the drill in your windshield repair kit. Insert the drill bit and tighten the drill head.


  1. Drill about ½ of the way through the first layer of glass. DO NOT go all the way through the first layer of glass. If you do, you will hit the laminate (plastic) and cause a permanent mark on the laminate.
  2. Place the bullseye tapper needle into the drilled hole.
  3. Tap the needle with the tapper just hard enough the create a mini-bullseye. This will make a good size hole and allow the resin to flow into the area very easily.
  4. Mount your holding structure with the injector and fill the drilled area using vacuum/pressure cycles.
  5. Cure under pressure for 2 minutes. (Cure time may vary with the intensity of your UV light).
  6. Fill the pit, cure, and polish.


Drilling is very important. You will be using it in many situations.


PRACTICE: Go to a glass shop and get a 12X12 or 24X24 inch piece of laminated glass or purchase a windshield a place it on a rack or two saw horses. Drill and tap 10 bullseyes per day for a week and you will be proficient by the end of the week. 

Common Stonebreaks That Need To Be Drilled

Troubleshooting

  1. Flowering: This is another reason for choosing the proper windshield repair resin is important. Generally, flowering occurs when you are using a resin that is too thin on a hot windshield. Use a thicker resin or make sure the glass is cool before beginning the repair. Using too much pressure, spreading the resin out and beyond the break can also cause flowering.


  2. Black Spots: Caused by not curing the break long enough under pressure and mostly seen in bullseyes.


  3. Spotty or Dirty Appearance: This is caused by contamination of the break either by your lubricant, moisture or very old break.


  4. Cylinder O-Ring not fitting: If your o-ring does not stay on the cylinder, it may be due to cured resin on the cylinder or the o-ring has swelled. Please see

    the Cleaning and Maintenance section and/or replace the o-ring.


  5. Large Impact: DO NOT REPAIR THIS DAMAGE IF IT IS WITHIN THE DRIVER'S LINE OF VISION!

Large Impacts Fall Into 3 Categories; All Can Be Repaired With This Technique.


  1. Impact area larger than the injector o-ring
  2. A significant amount of glass missing at the impact
  3. Multiple impact points

Considerations For Repair:

An airtight space needs to be created which can be used to deliver the resin under pressure and to remove the air under vacuum.

The more of the crushed glass that is removed before the impact area is sealed, the clearer the resulting blemish will be when the repair is complete.


  1. The repair technique for these types of damages must be chosen at your initial assessment. You cannot re-do a repair with this technique.

Windshield Repair Procedure For Large Impacts:

Wearing your safety goggles, remove all of the crushed, pulverized and cracked glass occupying the initial impact area or areas using the probe in your windshield repair kit. You want to remove as much of the damaged glass as possible. When done you should have a large crater.


  1. Using 2400-cps resin, place a generous amount on the glass above the crater and allow it to flow/roll into the crater. Use enough resin to cover the entire break area and let it roll into the impact point to prevent air bubble formation.


  2. Place a film tab to cover the entire break area, as well as any legs that may be surfaced. It is crucial to tab and cure quickly to prevent the resin from

     seeping into the bullseye or fouling the airspace around the impact crater.


  3. Cure the resin completely and remove the tabs but do not scrape. You now have a damage that is totally sealed and airtight.


  4. Drill a passage through the cured resin into the break, usually right at the original impact point.


  5. Star legs won't fill: Star Legs not filling is a common problem. One reason a leg of a break won't fill is that it is not connected to the bullseye or it is closed

    from lamination stress. The solution then is to connect it with the least amount of work, in the least amount of time without creating other problems use

    the Star-Leg Flexor to achieve this. Mount the Star Flexor in your windshield repair kit onto the leg almost touching the injector and begin turning the

    pressure bolt until you see the leg refract and connect to the breaks bullseye. Stop and let resin seep into the leg. See the directions for the Star Flexor

    Tool. Do the same for any leg that does not totally fill. You can also manually do this with the probe.


  6. The repair cured while repairing: You were not working in the true shade. The shade of a tree is not adequate. UV rays cure your resin and unless these are

     blocked the windshield repair resin will cure. Something solid must be used; cardboard, plasticized canvas, artist board, etc.

Cleaning Your Tools

You do NOT need to clean your tools very often. You generally store them upside-down with resin in the injector with the cap on so you are always ready for a repair. You only need to clean your tools when you feel the threads are not turning smoothly, the resin is not clear or you see cured resin. To clean - loosen the set-screw of the quick-turn injector and remove the piston out of the cylinder. Dip both pieces into 70-90% rubbing alcohol. Run the brush through the cylinder and then dry by running a small piece of rolled paper towel through the cylinder. Dip the threads of the bridge into the alcohol and brush the threads. Wipe the suction cups clean or use a glass cleaner if they do not wipe clean. 


For cured resin on the outside threads of your injector, soak in acetone and then brush clean.

DIY Windshield Repair UV Shield

Here's a easy to setup UV Windshield Shield that you can make in minutes and best of all works really well with your tools. Here at Ultra Bond, we don't sell you things you don't need; we are practical in how we do business. Get two Amazon Boxes and four 2 inch soft cups and you can have a chip and crack uv windshield shade

Newest Technology

  1. X-Phobic - Rain-X remover and brake cleaner
  2. Xtra Bond - Adhesion promoter - increases the adhesive bond to the glass
  3. Star Flexor - Flexes stone breaks and the legs of stars open so to completely fill breaks.
  4. Rainproof Additive - one drop added to 5-8 drops of resin will render your resin waterproof.

Rain-X Removal for Windshield Repair

xphobic-rainx-removal

X-Phobic - hydrophobic coating remover (patent pending) is for the removal of Rain-X to allow windshield repair adhesives to bond to the windshield glass avaliable as a pre-treatment and an additive. Without removal of Rain-X, the windshield repair resin will be blocked from the glass and the stone break or crack cannot be repaired. This will cause the consumer to have to pay hundreds of dollar for a new windshield and the windshield repair technician loses a repair job. Currently windshield repair technicians are losing hundreds of dollars per month due to the presence of Rain-X on the windshield. The are three versions of X_Phobic: (1) Additive, (2) pre-treatment and (3) primer for the Permashield.


This chemical mixture is a Rain-X remover for windshield repair and it will also remove carwash wax and detergents, moisture and other contaminants.


Directions: Some technicians are reporting that Rain-X is on 40% of windshields. Ask every customer before doing a repair if they have used Rain-X or have in their windshield washer fluid. You ca also test every windshield for Rain-X before starting the repair by placing a drop or two of water on the windshield surface. If it beads and rolls, there is a hydrophobic coating, most likely Rain-X. If the water rolls down and leaves a line of water then there is none.


Additive- Directions for Stone break: The Additive (the smaller bottle) is easier and faster. Mix one drop to 4-8 drops of resin in your injector and stir (a toothpick works best). Then do the repair.


Additive - Directions for a crack: Mix one drop to four to five drops of resin, then do the repair.


Pretreatment for a Stone-Break -This is the larger one ounce bottle.  Place  a d rop on the impact point of the stone-break and flex the glass to help it seep into the break. Allow it to evaporate and then do the repair. You can speed up evaporation with a heat-gun or hair dryer.


Pretreament for a Crack - This is the larger one ounce bottle. Drop into the entire length of the crack by cappilary action and then allow to evapoarte. Use a heatgun or hair dryer to speed up evaporation.


Purchase Price: One bottle of pre-treatment will decontaminate over 100 breaks. One bottle of Additive will do 60 breaks. Don't lose another job to Rain-X ! You’ve chosen a terrific way of integrating images and text into your website. Move the image anywhere you want in this container and the text will automatically wrap around it. You can display events team members new products and more easily and creatively. To start add an image from the Image Picker and edit it as you would edit any image in the system. For example you can link the image to existing pages in your site a website URL a popup or an anchor. After you’ve chosen the image add your text. You can add text that describes the image you’ve selected or simply use the image for decorative purposes. \nYou’ve chosen a terrific way of integrating images and text into your website. Move the image anywhere you want in this container and the text will automatically wrap around it. You can display events team members new products more easily and creatively. To start add an image from the Image Picker and edit it as you would edit any image in the system. For example you can link the image to existing pages in your site a website URL a popup or an anchor. After you’ve chosen the image add your text. You can add text that describes the image you’ve selected or simply use the image for decorative purposes.

The First and Only Adhesion Promoter for Windshield Repair

xphobic-rainx-removal

Xtra Bond (patent pending) is an adhesion promoter for windshield repair which will allow windshield repair adhesives to have a greater mechanical and chemical bond to the windshield glass by etching and priming the surface of the crack(s). The are three versions of Xtra Bond: (1) Additive, (2) pre-treatment and (3) primer for the Permashield.


Directions for a stone break: Use the Additive (smaller bottle) -one drop to four drops of resin mixed into your injector. Then do the repair.


Directions for a crack: (1) The additive (smaller bottle. Mix in your injector one drop with five to six drops of resin and stir (a toothpick works best). As a Pre-Treatment -this is the larger once ounce bottle, Inject by capillary action along the entire length of the crack and allow it to evaporate. You can use a heat gun or hair dryer to speed up evaporation. We also recommend you then prime the edge area (the four inches from the edge) of an edge crack with primer resin after the Xtra Bond has evaporated. Wipe off any excess on the windshield surface immediately.


Pre-Treatment Directions for a Stone-Break: Place a drop above the pit and allow it to roll into the pit before doing the repair. Flex the break with a probe to move the Xtra Bond into the break. Allow it to completely evaporate including any chemical that seeped into the break. Wipe off excess immediately. You can speed up evaporation with a heat gun or hair dryer.


Re-Repair Resin -There is a huge market for the re-repair of Safelite repairs as many of their repairs are not completely filled, many are just pit-filled. Much of this is because their technicians are not allowed to drill and their resin deteriorates rapidly in cold weather due to being underfilled by their repair equipment. We have seen and re-repaired as many as six in one day. This resin bonds to glass and their resin. It will also bond to any other acrylic, urethane, hybrid or epoxy resin which is most of the resins on the market.


For the radiating crack and partial bullsye just drill through their resin in the impact point which will only be in the pit since they do not drill. For stars where they have clogged up the bullseye and left the legs half-filled you drill and tap a bullseye at the tip of each leg and completely cure with your injector in the pressure mode. For bulleye or combination break where there are voids in the bullseye, drill the edge of the largest void to the pvb as they have no bond to the pvb. Their resin pulls off the pvb when they cure thus leaving a void between the resin and the pvb. After drilling to the pvb then fill using vacuum and pressure and as always cure with your injector in the pressure mode.


Rainproof Additive - Add one drop into your injector with 4-8 drops of resin depending on amount of water in the break. Then stir with a plastic toothpick. Do multiple pressure and vacuum cycles to mix the resin with the water in the break. Disgard the remaining resin in the injector after you are finished with the repair.  X-Phobic - hydrophobic coating remover (patent pending) is for the removal of Rain-X to allow windshield repair adhesives to bond to the windshield glass avaliable as a pre-treatment and an additive. Without removal of Rain-X, the windshield repair resin will be blocked from the glass and the stone break or crack cannot be repaired. This will cause the consumer to have to pay hundreds of dollar for a new windshield and the windshield repair technician loses a repair job. Currently windshield repair technicians are losing hundreds of dollars per month due to the presence of Rain-X on the windshield. The are three versions of X_Phobic: (1) Additive, (2) pre-treatment and (3) primer for the Permashield.


This chemical mixture is a Rain-X remover for windshield repair and it will also remove carwash wax and detergents, moisture and other contaminants.


Directions: Some technicians are reporting that Rain-X is on 40% of windshields. Ask every customer before doing a repair if they have used Rain-X or have in their windshield washer fluid. You ca also test every windshield for Rain-X before starting the repair by placing a drop or two of water on the windshield surface. If it beads and rolls, there is a hydrophobic coating, most likely Rain-X. If the water rolls down and leaves a line of water then there is none.


Additive- Directions for Stone break: The Additive (the smaller bottle) is easier and faster. Mix one drop to 4-8 drops of resin in your injector and stir (a toothpick works best). Then do the repair.


Additive - Directions for a crack: Mix one drop to four to five drops of resin, then do the repair.


Pretreatment for a Stone-Break -This is the larger one ounce bottle.  Place  a d rop on the impact point of the stone-break and flex the glass to help it seep into the break. Allow it to evaporate and then do the repair. You can speed up evaporation with a heat-gun or hair dryer.


Pretreament for a Crack - This is the larger one ounce bottle. Drop into the entire length of the crack by cappilary action and then allow to evapoarte. Use a heatgun or hair dryer to speed up evaporation.


Purchase Price: One bottle of pre-treatment will decontaminate over 100 breaks. One bottle of Additive will do 60 breaks. Don't lose another job to Rain-X ! 

New Windshield Repair Tool Instructions

Star Flexor

The #1 mistake made in the repair of a stone break is leaving a leg or legs unfilled or not completely filled to the tip(s). This new windshield repair tool eliminates that problem. The Star Flexor can flex open any unfilled section of any type of stone break.


The first photograph on the left uses the least amount of pressure with a two-inch suction cup for pressure and 1 ¾ inch suction cup for stability. These cups are also low profile so the pressure point is more blunt rather than pin point. The small bolt will allow the pressure point to be altered and raise the tip up for viewing progress when you are mounted over and parallel to a leg.


The second photograph is a three-inch suction cup with a higher profile. This will allow more pressure and pin point pressure. Pressure in all modes is controlled by the pressure bolt. The experienced technician will prefer this set up and this mode most often. Moving the cups toward the point alters the pressure and the profile. Reversing the tool also changes the pressure from pin point to blunt. Blunt can be used for flexing sections of a break, which comes in handy when using higher viscosity resins or on a star burst. Higher viscosity resins have more durability and should be used for breaks over the defroster area.


The third photo is the Star Flexor 2. This mode has the most stability and the profile can be adjusted by moving the cross bar into the four mounting holes. The fourth hole will give the highest profile and the third is where I seem to use it most often. The second hole can be used for blunt pressure to flex more than one leg at a time such as with a star burst. 

STARTING UP YOUR BUSINESS

There are 4 things you should immediately do to establish yourself as a business. 

  1. Determine the form of ownership for your business. There are a number of different forms of ownership such as sole proprietorship, C-corporation, S-Corporation, LLC etc. Each form of ownership has advantages and disadvantages. You may want to seek expert advice from an attorney or an accountant.


  2. Choose a name for your business. Your name can have a significant impact on the level of success you achieve, both in the start up phase and over the

     long run. Choose your name carefully because you should expect to have it for a long, long time. Some of the criteria to consider are:

  1. A name beginning with "A" will give you the first placement in the telephone book, such as AA Windshield Repair but most people thumb the phone book going backwards so this is not a reason to start your business name with an a.
  2. It should be easy to remember. Catchy, related to a local landmark, such as Rocky Mountain Windshield Repair. Refrain from using names with double meanings or one that could be confused with someone else's business. You might want to think of some logos that will give you an idea for a name. They will be tied together and should compliment each other. They should be used throughout all forms of your advertising, car, business cards, and shirts.
  3. Your name should not include Ultra BOND in it, but feel free to state "using the Ultra Bond system"

.

  3. Go to your state's Secretary of State Website and apply for an EIN (employer identification number). This is done on-line for free or a minimum charge.

     Use this EIN for your bank account and to give the insurance companies and their networks.

The Networks

If you do not repair cracks then joining the network will not have much affect on your business. They mostly steer to their own shops so do not expect them to be sending you business. However you will have to deal with them when you do insurance work.


Call the claim phone number on the insured's insurance card and follow the prompts. When you call in your first repair you will be in the system and they will fax you tax forms for you to fill out and fax back to them. You are then in the system. You will get paid within about 30 days.


  • LYNX - Fax your invoices to Glass Comp. at (239) 479-6161
  • Safelite - go to www.sgcnetwork.com and fill in the blanks
  • Harmon - fax to the number on the dispatch they fax to you


Have the Assignment of Proceeds printed on your invoice


Assignment of Proceeds - In consideration of [COMPANY NAME]'s agreement to repair or replace my damaged automobile glass, I hereby assign my auto glass claim and all policy proceeds due me for the glass claim under the terms of my insurance policy to [COMPANY NAME]. Accordingly, I instruct my insurance company to address all issues associated with this claim with [COMPANY NAME] and to pay all amounts amounts directly to [COMPANY NAME]. I authorize my insurance company to release policy, coverage and other information related to this glass claim to [COMPANY NAME]. I agree to pay my deductible, if any, myself. I also agree that if I do not have insurance coverage, I will pay for the work myself. 

MARKETING AND ADVERTISING

ADVERTISING MUST BE CONSISTENT! ADVERTISING MUST BE CONSISTENT! 


Wherever you choose to advertise, be consistent with it. Potential customers will begin noticing your ad and you need to be there when they need you. You are offering a new and unique service and you have to educate them.


A good way to preserve your cash flow is to establish accounts with your advertising sources. Although they may require an up-front payment for your first ad, you are billed thirty days after you have been advertising and the bill is not due for another thirty days, giving you sixty days to make money on the ad before having to pay for it.


Basic Sources of Advertising:

  • Internet
  • Company Website - a must
  • Google Adwords
  • Yellow Pages - check your area. getting obsolete in some markets
  • Newspapers
  • Weekly Advertising Circular
  • Radio
  • TV
  • Direct Marketing - best and most lucrative for chip repair

Market Study:


For all forms of advertising, you can find independent surveys that give you the most relevant demographic and consumer data available for your area. The studies indicate how many people are listening to the radio, watching t.v. or reading the newspaper. Ask media representatives for their survey and compare it to an independent one to get the most accurate information. Your local chamber of commerce should be able to direct you to those resources.


Newspaper:


Your market survey should tell you which newspapers were read within the time period they survey. Some will also show the number of days read by the largest percentage of customers, their age group, and income.

Newspaper generally ranks second for best source of income. You need to select a consistent period to advertise (once a week, once every two weeks), and try to be consistent where your ad is placed. Use your logo each time your ad runs, or at least be sure the heading remains the same. Customers will begin to recognize you by that logo or heading. Your wording can change as often as you want - offer a special, but something must remain the same every time (logo). Your representative will be helpful in letting you know which days have the most readership, which can vary with seasonal sports. You may want to be in the sports section on Mondays during football season or in the food section on coupon days.

The benefit to the newspaper is that the customers are usually more qualified. They have read your ad, are curious about your service, and more than likely, have a repairable break on their windshield when they call. Also, the newspaper seems to draw the customers will new vehicles that have been damaged and that are expensive to replace.


Weekly Ad Circular:


They can work, are cheaper than the newspaper, but may require more repetition or a larger ad. It's a good place to do coupon advertising. Be sure to include an expiration date. Display ads are better than reader ads; a picture is worth a thousand words and it's hard to describe a new service in 1 or 2 lines.

ADDITIONAL SOURCES OF ADVERTISING:


Radio:


Market surveys for radio change more often because the stations are constantly changing their format. Probably the best surveys will be the ones you get from each station. You want to know when they have the largest listening audience, how many stations there are in your area, and what percentage or the total listening audience is listening to that station! Radio can be expensive and risky.


TV:

From your market surveys find out how many people watch the local news and what time and stations are the best. Unless you can find a widely watched, inexpensive cable time slot, TV might not reach a large number of people on a consistent basis. However, because of the additions of cable and satellite, some areas have dropped their rates for local stations. If you have local ABC, NBC, CBS or FOX affiliates this is a very god source of advertising.


INTERNET:

Have a website made, optimize and submit to the search engines. Call Rich for contents for your website and recommendations.


HELPFUL HINTS FOR ADVERTISING


An ad must get the message across at a glance if in print. Don't get too wordy. Try pictures, but make sure something in your ad stays the same all the time and is recognizable.


The heading should be the main message you are trying to convey "THAT CRACK CAN BE FIXED!" "LONG CRACK REPAIR" "DON'T REPLACE IT". Your business name should not be the biggest, but can be included in fairly large print if your name is descriptive "FIX A CRACK WINDSHIELD REPAIR".

The body of your ad should have the details and information needed for a person to make a fast decision. Keep it short and clear to the reader; they are not a repair technician. If you are the only person in the area doing windshield repair, refer them to the yellow pages if you have an advertisement there.

For t.v., showing what you do is the best. For radio, too many words can cause the listener to tune out. If you can relate the ads to the customer, they are more likely to watch or listen. Does your area do road repair or chip sealing that causes breaks in windshields? How did you get a crack in your windshield? By asking people how they got their break, you'll get an idea for a commercial.


A magnetic or hand painted sign on the side or back of your vehicle is a great and inexpensive form of advertising. Use the logo you are using in your advertising - recognition.


PROSPECTING 

Business to Business


There are two cost-effective ways to prospect, cold calling and telephone solicitation. We have enclosed a partial lit of potential business customers that you may be able to reach in person or by telephone. Get the word out to your friends, neighbors, and businesses you currently use for different services (mechanic, lube & tube).


1. In person (cold calling)


The most productive way to prospect would be to do it in person. Set yourself a schedule to call on five businesses per day. It is advised to do no more than 10 and no less than 10, but you should do it every day. Consistency. The reason you don't want to do more than 10 calls a day is that you may get discouraged if you are turned away too often.


When entering a business you will need to speak to the person in charge of vehicle maintenance. Ask if they have heard of windshield repair versus replacing. Let them know how much it could save their company (up to 75% most of the time). Offer to do a free repair - you choose the break. If they pick, they will pick the largest and worst break, which could be dirty.


Offer a special fleet rate and a schedule where you would come in once a week or once a month to check their windshields. If they have heard of windshield repair or if they already have someone doing their repairs, ask them if they are satisfied with the work being done and then inform them that your service offers long crack repair, which can save them even more. Leave a card, magnet, brochure, pen, anything you think they might keep, read and remember you by.


2. By telephone


Telephone solicitation is more difficult because it will take you longer to reach the person who makes the decisions or is in charge of vehicle maintenance. Make 10 calls a day every day if this is the avenue you choose.


PHONE PITCH

The customer calling will most likely not know anything about windshield repair. Therefore, your first step is to take control of the conversation. Never let the customer take control. You are the one with the knowledge.


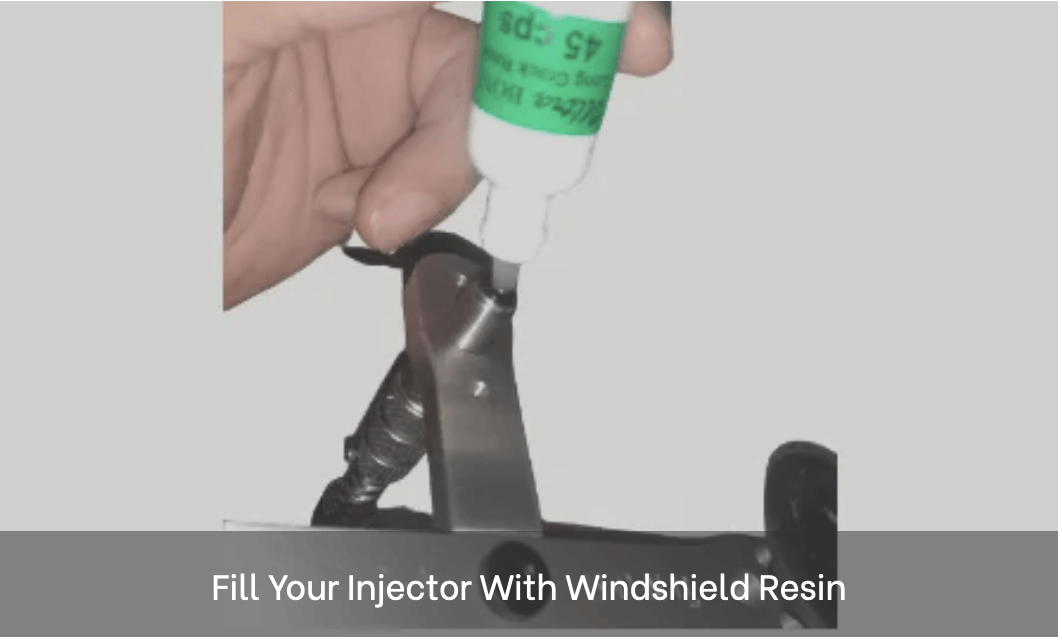
Ask: Have they ever heard of windshield repair before? No? Describe what you do. "We inject clear glass adhesive (or resin) into the break which will fill in the gap and prevent the break from spreading any further. It will significantly reduce the appearance of the damage and restore the strength.


Ask: Could you please describe the break, what caused it, and how long ago did it occur? (By asking questions, you show that you have to have specific information to perform the repair - knowledge, you are qualifying the repair, and showing interest and concern to the customer). Proceed: "Your windshield is repairable and the cost is only $__________. Let them know about your shop service or mobile service. The customer will usually just say "uh huh" or "okay", which is your sign to close the deal.


Proceed: "We have tomorrow available at (time) or (time). If they seem hesitant, give them a little more information - your written warranty, how long cracks have been repaired, etc. If you are sure their insurance company covers repairs, tell them to bring their insurance card and the repair may cost them nothing - but be sure you are correct. You want to get them in the shop. With the insurance networks sending customers to their own list of vendors, you have to keep the control in your hands. Once the customer is in your shop, the network can't make them leave. Go for the close again.

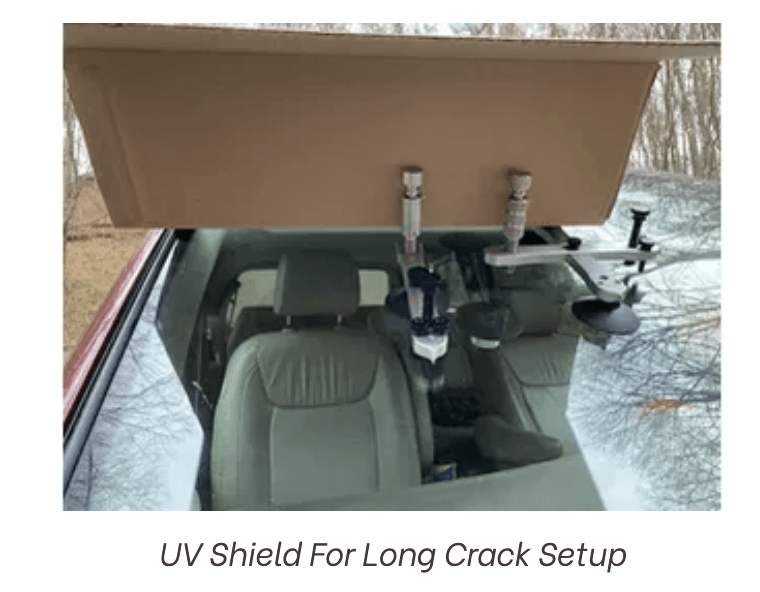
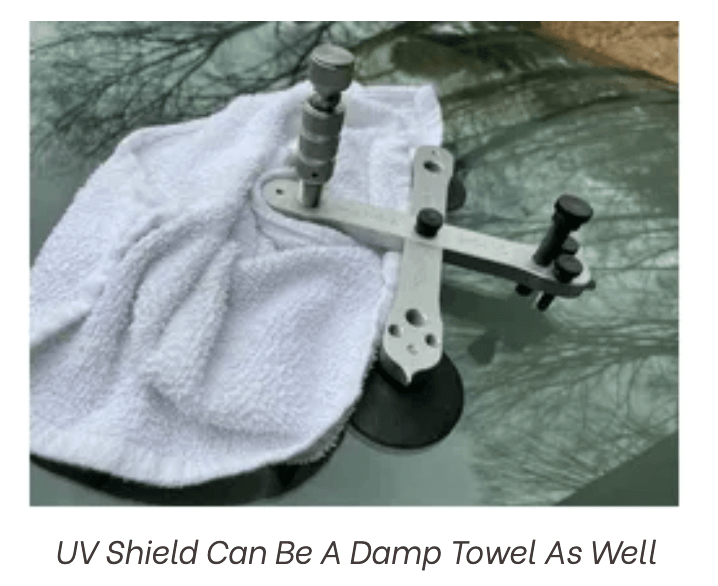
Confirm the date and time of appointment. Be sure you tell the customer not to wash the windshield prior to coming in - you will clean it for them when you are done. Water may prevent the resin form adhering to the glass (showing off your knowledge again). If performing the repair via mobile service, show the customer how much you care about their car. Protect it. Get it into true shade, use a big towel to protect their car and clean the windshield thoroughly when you are done.


Always repeat the procedure to the customer before performing the repair, have them sign the warranty, making sure they are clear that the break will not disappear completely. You are performing a repair service - not giving them a new windshield.


DIRECT MARKETING - GET INTO A PARKING LOT - Some grocery and department stores will rent you a space in there parking lot. You can also see if a car wash, car repair , tire store, etc. will allow you to be in their parking lot for a fee (preferred) or offer them 1/4 of your gross income as they are providing the customers. Surveys have shown one out of every three vehicles has repairable damage. You will only need nine-ten customers per day to see a six figure annual profit giving 1/3 to the owner. Better for you to get a flat rental fee so they do not know you have struck gold in their lot. 


Getting Your Windshield Repair Business Up and Running in One Month

1. Domain Name - Go to www.godaddy.com and purchase a domain name. Your domain name would be the keyword that is searched. Best to get www.godaddy.com .The name of your city or town after windshieldrepair. Example www.godaddy.com is our local website. Cost is about $19.00 for a domain name.


2. Hosting Package - Purchase a hosting packing from godaddy for your domain name. Cost is about $50-70 per year..


3. Internet Advertising - Go to yellowpages.com, yellowbook.com, the yellowpage.com. and list your business under windshield repair, windshields and auto glass. Cost is 0.


4. autoglasssearch.com will place you in multiple websites. You are only charged when someone calls you from that advertisement. $13.50 per call. Call 888-268-2507 or e-mail support@autoglasssearch.com with questions about their advertising service.


5. Google Adwords- Google will walk you through and help you. You control your budget. It can be anywhere from $100 per month to $500 per month. This places your website on the top of the page when someone in your area searches windshield repair.


6. Google Places – almost like your own website with Google. You will show up on maps organically when people search for windshield repair.


7. YouTube – Shoot a video of yourself doing a repair or about your business. Post it on YouTube with keywords that include the name of the town(s) you work and windshield repair, windshield, windshield crack repair, auto glass, glass repair and auto glass repair, etc.


8. Angie’s List – Go to Angieslist.com and register your business and create a profile. This is where many people shop for a credible business. Cost is 0.


9. Craig’s List – Local internet classified advertising. 

CONCLUSION

As with most anything you do, the more you practice and perform actual repairs, the better technician you will become. You may even develop a technique that works better for you. You are encouraged to share your ideas, experiments and stories with your fellow technicians and us by sending a letter, or contacting us by e-mail.


Good luck! You're on your way to controlling your own future.


REPAIR MORE..... MAKE MORE


ULTRA BOND, INC.


Contact Information


2458 E. Main Street, B-1,

Grand Junction, CO 81501


970-256-0200 (phone)

970-256-1786 (fax)

Company Email


This windshield repair manual is provided by Ultra Bond and is strictly about windshield repair resin, tools, equipment and supplies. 

WORLDS HIGHEST LAB TEST SCORES 

WORLDS HIGHEST LAB TEST SCORES

WORLDS HIGHEST LAB TEST SCORES

Independent Lab Testing  to meet the 2014 ROLAGS resin requirements showed that the mechanical strength of windshield glass is at least 52% stronger than new windshield glass after being cracked and repaired with Ultra Bond Windshield Crack Repair Resins. That means that after repair auto glass can be at least 152% of new undamaged auto glass strength when cracked and repaired with Ultra Bond Long Crack Windshield Repair Resins. 


Per the American National Standard Institute approved Repair of Laminated Auto Glass Standard (ROLAGS) the test samples are cracked from edge to edge and then repaired.Half of the repaired samples are then tested to and compared to new undamaged samples with the other half of the repaired samples going into a QUV for accelerated weathering. The ROLAGS requires crack resin to be at least 70% of the undamaged glass strength after exposure. Every cracked and repaired sample before and after exposure far exceeded the 70% - scoring higher than the highest scoring undamaged auto glass sample. The lowest score after exposure of the repaired samples was 152% of the undamaged glass. More than double what is required to pass the standard. 


Two other other characteristics of Ultra Bond's long crack resin formula that again showed up in the mechanical strength test was that the glass is what gave way and broke, not the repaired crack. The repaired crack was still intact after the glass broke. The resins also gained strength after exposure. 


Lab Tests since 1993 of Ultra Bond Long Crack Repair Resins have consistently resulted in meeting and exceeding new auto glass strength. 

DOWNLOAD THE ROLAGS LONG CRACK LAB TEST

You may have a problem you don't know you have with your current resin! Do you have mechanical strength tests on laminated glass showing what percentage of new glass strength you have restore to? Have you checked your repairs from over a year ago to inspect the performance of your resin? Most of you might be thinking, pffffhhh sure they are fine. Or maybe there are some of you that have seen your repairs again after a few months and they seem fine.


However, just assuming things are fine is leaving you and your business reputation exposed. In order to determine these truths, you need to ask yourself this question. Do you know which of your customer's vehicles are garaged or not? Are they in a 4 season geographical climate ?


If you haven't called back your non-repeat customers that are in a four season climate and are not garaged to inspect after a year, you don't know whether your resin or repairs are performing as you've guaranteed.The picture to the right is a 12-inch Ultra Bond long crack repair still perfect after a real-world rollover crash.


Designed To Open Glass

The Ultra Bond Crack Master utility is the stabilizer leveling bolt and pressure bolt that enables the controllable opening and flexing of the crack(s), legs or break and injects resin into the impact point of a stone break or a long crack to the microscopic perimeter.

Wicking To Max Resin

The Quick-Turn Injector has a vacuum chamber that enables you to create a wicking action with the resin and is essential in maximizing the resin to chemically bond with windshield.

Wonder Bar Versatility

The Wonder Bar being longer than the competition creates the necessary leverage during a chip repair or long crack repair aka edge crack repair. You can'not effectively open up a crack(s) with short or small devices!

       "Meet In The Middle" Best Long Crack Windshield Repair Technique

     "Meet In The Middle"         Best Repair Technique


What you will witness below, is a patented repair method and tool invented by Richard Campfield, President and Founder of Ultra Bond. The Meet In The Middle Professional Windshield Crack Repair is the #1 Method for Repairing a Long Crack also known as the edge crack.

Why Do You Need To Upgrade Your Existing Tools?

  Why Do You Need To Upgrade Your Existing Tools?

You Can Inject

2400 CPS

Large impact windshield repair proc edures and long cracks need heavy duty windshield crack repair resin in order to fill the width of an edge crack and create access.

Cracks near the edge of the windshield need 1600 to 2400 and is why you need Ultra Bond resin and our tools to "wick" the windshield and to fill the crack till there is an overfill.

Many other tools on the market using watery thin resins with cheap tools unable to open the crack of a windshield to ensure there are no microscopic air pockets and a bond to the pvb layer.

UPGRADE YOUR SYSTEM TODAY

  UPGRADE YOUR TOOLS

Long Crack Upgrade Kit

Expand your business and upgrade your existing business with this Long Crack Windshield Repair Kit. Stop replacing repairable windshields, protect your customers, and walk away from your repair jobs with pride and confidence. Our Tools, Our Resins, Our Repair Process are unmatched  - place your order today!

Place Your Order

Maximum Upgrade Kit

Get the Crack Master Bridge, Long Crack Upgrade Tools, and Expand your earning potential. This setup gives you the ability to repair Stone Breaks, Rock Chips, Star Breaks, and Long Cracks. This set also features 20 cps, 45 cps, 400 cps, 1600 cps and 2400 cps windshield repair resins.

Place Your Order

Professional Repair Kit

So you're fully sold into the Ultra Bond brand? Take it to another level and completely upgrade your business. Get rid of the unproven tools and resins that you may have bought from the other brands we mentioned. This is everything you need to professionally repair windshields!

Place Your Order

Windshield Chip Repair Upgrade Kit

chip-repair-windshield-upgrade-kit

Upgrade your windshield repair business business with the Ultra Bond Wonderbar Bridge Windshield Upgrade Kit. Stop wasting resin and give yourself the mechanical leverage you need to make windshield chip repairs easy. Walk away from your repair jobs with pride and confidence.

$399.00

MORE INFO

Long Crack Repair Upgrade Kit

long-crack-windshield-repair-upgrade-kit

Expand your business and upgrade your existing business with this Long Crack Windshield Repair Kit. Stop replacing repairable windshields, protect your customers, and walk away from your repair jobs with pride and confidence. Our Tools, Our Resins, Our Repair Process are unmatched  - place your order today!

$499.00

MORE INFO

Windshield Repair Maximum Upgrade Kit

maxmium-windshield-repair-upgrade-kit

So you're fully sold into the Ultra Bond brand? Take it to another level and completely upgrade your business. No need to use untested tools and resins that you may have bought from the other brands we mentioned. This is everything you need to professionally repair windshields back to 100%!

$799.00

MORE INFO

Chip Master

Windshield Repair Kit

chip-repair-windshield-upgrade-kit

Upgrade your windshield repair business business with the Ultra Bond Wonderbar Bridge Windshield Upgrade Kit. Stop wasting resin and give yourself the mechanical leverage you need to make windshield chip repairs easy. Walk away from your repair jobs with pride and confidence.

$799.00

MORE INFO

Crack and Chip

Windshield Repair Kit

long-crack-windshield-repair-upgrade-kit

Expand your business and upgrade your existing business with this Long Crack Windshield Repair Kit. Stop replacing repairable windshields, protect your customers, and walk away from your repair jobs with pride and confidence. Our Tools, Our Resins, Our Repair Process are unmatched  - place your order today!

$899.00

MORE INFO

Crack Master

Windshield Repair Kit

maxmium-windshield-repair-upgrade-kit

So you're fully sold into the Ultra Bond brand? Take it to another level and completely upgrade your business. Get rid of the unproven tools and resins that you may have bought from the other brands we mentioned. This is everything you need to professionally repair windshields!

$1199.00

MORE INFO

Thousands of Satisfied Windshield Repair Technicians!

Share by: